 |
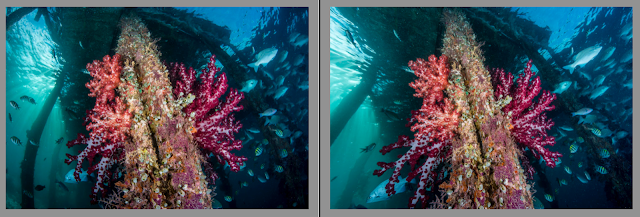
Barrel distortion makes this soft corral look bunched up and the piling curved on the original to the left.
On the right image, lens corrections were applied and a new file created in Photoshop. |
Ultra-wide fisheye lenses are the preferred wide angle lens underwater due to their close focusing ability, sharp corners and wide field of view. Divers can get very close to their subjects, filling the frame, eliminating water which makes their photos lack sharpness, color and definition.
But there is a drawback to fisheye lenses when shooting the straight lines, commonly of a pier or wreck, or models or other similar subjects - optical distortion is introduced. This is usually barrel distortion, but it can manifest itself as pincushion distortion, or a mix of both. It is usually worse the closer you are to the subject. Tilting your camera up and down can help a bit and is something to be aware of as you shoot.
 |
| Barrel distortion is most common on wide lenses. |
What are Common Lens Distortions?
In
barrel distortion, image magnification decreases with distance from the optical axis. The apparent effect is that of an image which has been mapped around a sphere (or barrel). Fisheye lenses, which take hemispherical views, utilize this type of distortion as a way to map an infinitely wide object plane into a finite image area. This curves those lines and the closer you get, or when shot at more of an angle, can lead to a distorted view.*
There is also
pincushion distortion with the center looking pinched. You’ll see this slightly in longer macro lenses and telephotos.
 |
| Droopy barrel on left, corrected on right. |
Sometimes that looks very dramatic and lends diagonal lines to the image, but particularly on man-made objects, or diver-models the proportions it lends looks wrong.
Generally, with most lenses from major manufacturers (except for m4/3rds lenses), you can adjust this in Lightroom under the
Develop tab using the “
Lens Correction” tool menu.
Basic, Profile, Color & Manual that are used to lessen lens effect distortion and correct lens color aberrations.
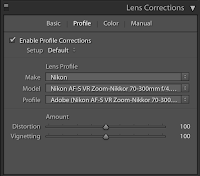
There are 4 tabs within it:
- Basic: This is sort of an Overview with some auto settings.
- Profile: Just check the box to switch the corrections or aberration removal on. Many lenses are listed from camera and lens manufacturers. Choose your manufacturer and lens (or something close to it) and the profile correction is enabled correctly. There are adjustments here for lens correction.
- Color: Color aberration is commonly seen on macro shots where you’ll have a purple or green 1-2 pixel fringe around contrasty areas. You can enable the correction and adjust it here.
- Manual: This allows for manual correction of many aspects of the photos. Some experimentation will show you what the adjustments do. remember you have full control of the history of all adjustments in Lightroom should you want to start over.
All this is easy to do in Lightroom. But what if you’re using an Olympus or Panasonic camera with m4/3rds lenses? They don’t show up in lens profile and their profiles "can't be found". The reason is that micro 4/3rds lenses have the profile correction build into their RAW files. Which is cool, but my experience is that auto correction is not usually enough, images still look distorted. like the gun barrel above.
 |
| Lens Corrections filter in Photoshop works on all files. |
Edit in Photoshop
This is where “
Edit in Photoshop” can help. It also can also be used to give more control with other lenses as well. Simply select the photo and go to “
Photo” menu: Select “Edit in…” and choose “
Photoshop”. This will open a copy of the photo in full high resolution for you to edit further in Photoshop.
In Photoshop choose the “
Filters” and select “
Camera Correction” filter.
This opens up a large filter effects window that gives you some of the same adjustments and a lot more so that you can fine tune your photo in Photoshop. This allows m4/3rds lens users to straighten this straight lines and reduce distortion in their photos as well as make many other adjustments to improve their images.
The Camera Correction filter is pretty powerful, and you can remove and
adjust many different aspects of shots, including vignette, color
aberration, lens distortion and horizontal or vertical perspective, crop
and more. Just go to the "Custom" tab within the filter. It's all
pretty straight-forward and easy to see the results as you go. The best
way to figure it out is just to play with it.
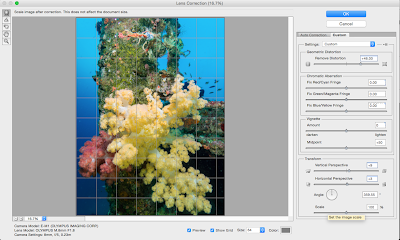 |
| There's lots of control for correcting images, even with m4/3rds lenses. |
When you like what you are seeing, just hit ok to process the effect,
and your edited photo is displayed in Photoshop. You can choose “undo”
and “redo” to toggle the effects if you like. If you like what you’ve
edited, just “Save” it and the photo is saved and added to your
Lightroom Library as a high-resolution tiff file and numbered "1 of 2", etc.
Remember
Photoshop is only working on a copy - it will not effect your original.
These adjustments will also effect the crop and you can try some of the
other controls to adjust that problem as well. It’s all sort of a
balancing act for your creative eye to judge. Don’t be afraid to try a
few ideas out then you can “A-B” them in Lightroom to pick your final
image.
I’ve done a few examples. One the wreck image, the deck cannon barrel was distorted where it went through the center of the frame by the Olympus 8mm FE PRO lens I was using. I removed some of the barrel distortion to straighten it.
The same was true with the yellow soft coral image above. The center was sort of “poofed out” with barrel distortion and the piling it was on had a curve to it. By adjusting the controls, I was able to lengthen the clump of soft coral and flatten it a bit, and also slightly straighten the piling, making it a more natural image.
 |
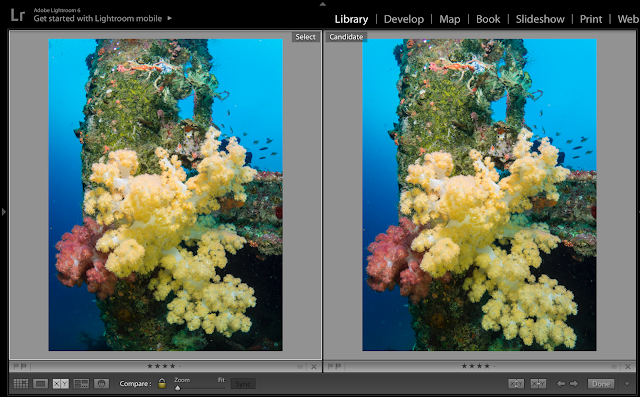
| Original on left, "corrected" image on right. This was done directly in Lightroom as my Sigma lens was supported. |
The pilings were easily straightened on the above shot. I also altered the vertical and horizontal perspective to bring the soft coral more front and center and not loose the school of fish. It took some give and take not to crop too much of the image.
You don’t want to overdo the corrections, and you’ll usually not want to remove the distortion all together, as then you won’t have a very wide angle shot and it will lack some punch. Just try for a more natural look.
But don’t be afraid to straighten out those wrecks, pilings and people for a more natural presentation.
— Jack Connick
*(Source: Wikipedia)


