
Underwater Photography News, Reviews and Trip Reports from Optical Ocean Sales.
Friday, August 4, 2017
Lembeh Straits Macro Video on a Nikon D500
I've (finally) edited together a video of macro critters from Lembeh Straits during last year's Photo Expedition to Dive into Lembeh resort. I used a Nikon D500 camera, 60mm macro lens, diopters in a SEA&SEA MDX-D500 housing with a Kraken Sports Hydra 5000 video light. It includes footage of a rare "Hairy Octopus". All shot hand held!
Saturday, June 3, 2017
Saga Dive Trio Macro Lens Review
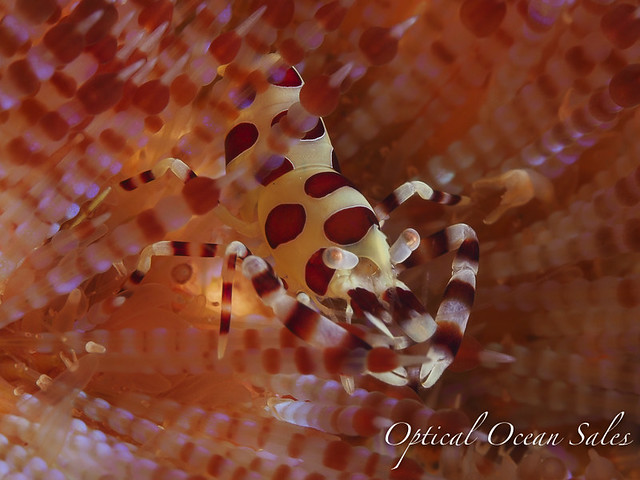
 I love shooting underwater macro – specifically super macro. One of the challenges of this discipline is deciding on which diopter to bring along on a dive. Inevitably I choose one strength lens and wish I had brought along something different. Enter the Saga Dive Trio. This innovative lens from Spanish optics manufacturer Saga Dive, combines a +5, +10 and +15 diopter in one unit, giving you the ability to shoot anything from a fish portrait to a pygmy seahorse on the same dive.
  On a recent trip to Anilao, Philippines I was afforded the opportunity to put the Trio to the test. My rig was comprised of a Nikon D7100 housed in a Sea and Sea MDX-D7100 housing with a Nikon 105mm VR lens. I added the Trio via the 67mm thread mount on the front of my port. I was a bit concerned that the Trio might be a bit cumbersome or awkward underwater, however this was not the case at all. I did not notice much difference in buoyancy from my +15 diopter on a flip adapter. The system rotates to aid in camera/light positioning. I did add a very short arm to my focus light to assist with getting light directly in front of the lens. Magnification from +0 to +15 is managed by very simple pair of levers on the front of the lens.
  Being in the critter capital of the Philippines provided an abundance of subjects. On my first dive with the Trio, my guide excitedly gets my attention. He has found a hairy shrimp. To the naked eye it looks like a tiny red spot of lint. Dropping down both levers to put the Trio at +15. I line up my shot. Click. Flash. I check my review screen and am thrilled with the result. After a couple more shots I switch places with my dive buddy who has found a beautiful, and bigger, nudibranch. By lifting up the right lever I am ready to shoot at +5. I could get used to this. During the course of the dive I used all the settings of the system. I found that to be case on every dive.
  During the rinse down at the end of the day I was surprised at how much debris had accumulated between the lens and my port glass. Anilao is a mucky environment and there was quite a bit of sediment in the water column. For the rest of the trip I made it a point to take off the Trio between dives to give it a rinse. Problem solved.
 Upon reviewing my images at the end of the trip I was very happy with the results I got from the Trio. I found the images to be quite sharp through the +10 setting. At +15 the edges tended to lose a small amount of clarity, a trade off I am willing to make in exchange for versatility. Having the ability to change magnifications so easily was very useful. It is hard to imagine going back to using a single lens for an entire dive. I would recommend the Saga Trio to anyone interested in macro photography. — Billy Ball
Saturday, April 22, 2017
Review: Kraken Weefine Underwater Photo Ring Light
 The latest offering from Kraken Sports is the WeeFine Ring Light for macro illumination. This innovative light attaches to any threaded port and is similar to ring flashes using strobe lights that have been on the market for a while. However, it features a constant-on 1000 lumen light and is small, lightweight and self-contained. As with all Kraken Sports products, build quality is excellent, with an even, high-quality output and well-designed anodized construction.
This light is intended for very close-up use. It has a nicely beveled center section that tapers to allow you to put the light over small subjects without hitting them. The battery holder and light swivels on the center section, so you can flip it around out of the way during the dive. By using step up rings, you can attach the light to almost any threaded port. I used it with both an Olympus PT-EP14 (67mm) and TG-4’s PT-056 (52mm) housing easily.
It’s 1000 lumen output has three power settings, and comes with a standard 18650 lithium battery and cradle charger. The switch bezel uses colored lights to tell you the remaining battery strength.
 The Weefine Ring Light’s small, self-contained size, and nearly neutral weight, make it ideal for a macro camera rig with bright illumination that is “plug and shoot”, it’s as easy to use as taking photos above water.
 On our recent Komodo Park dive trip, I shot it with the Olympus E-M1 MKII in the Olympus PT-EP14 housing and 60mm macro lens. One limitation I ran into is that you cannot add or remove a macro diopter lens underwater. You have to decide above water how much magnification you want to use. I used a +5 diopter, but it might be better to use a +10 or greater and shoot super macro.
There has been a lot written about taking photos using constant-on lights. The issue is not only lumen output, but longer exposures. Strobes are designed to put out a tremendous amount of light instantaneously that freezes motion and gives rich color saturation. A light just doesn’t give the same effect, unless it is very powerful and is used close enough that the color of the water doesn’t affect color temperature. By my eye photos taken with a light as compared to strobes look a bit soft and flat.
 I found that on the Olympus E-M1 MKII slr, the 1000 lumen power was weaker than I'd like to see for reasonable exposures. I had to use high ISOs along with slow shutter speeds for proper exposure, so image quality and sharpness suffered. Of course the smaller the subject matter the closer you can get and the better the exposures.
The ring light’s small size and constant exposure made shooting very quick. I got some good shots of a quickly moving small Wonderpus by being able to move in quickly and use the fast frame rate of the E-M1 without waiting for a strobe to recycle.
Light quality using any ring light is even and flat. This makes the Kraken ideal for scientific captures without shadows, but it’s not a creative lighting source that could add shadows and depth. Trying to tilt it one way or the other just made the shot evenly underexposed on one side.
 I also shot the ring light with an Olympus TG-4 compact. This camera is well-known for its exceptional macro capability. It has a built-in strobe for macro, but the camera’s Super Microscope mode, that normally uses an LED light on the camera for illumination, is not available when inside a housing. The Kraken Ring Light works great as a substitute.
With the Kraken Weefine Ring Light, the TG-4 really came into its own for super macro photos. I used it in Program mode and selected a high aperture. It seemed to work better than the high-resolution E-M1, with a greater exposure latitude.
 What was nice was that I could carry both two cameras together on a dive. The TG-4 and ring light was so small that I could clip it out of the way, while using the larger E-M1 strobe rig for wide angle, and then be able to switch to the TG4 for macro shots. I could easily place into tight spots that the bigger camera couldn't reach.
You can use the TG-4 to shoot more normal shots but you can't zoom all the way out to the widest lens setting. As such also you cannot use underwater Wide 1 mode which fixes zoom. The ring light obviously wouldn't work for illumination for those types of shots. The constant-on light would also be good for macro video use, although I didn’t get a chance to test it.
 To get modest exposure times, I had to use the light on full power. I was only using a standard 1100mha battery on a prototype unit. As such, battery run time on the light was problematic. Even turning it down between shots, I could only get 35 to 40 minutes from the light. This should be improved on the production model as Kraken will ship the light with a larger capacity battery.
 In the end, I found that at 1000 lumens it’s not strong enough for slrs without compromising image quality unless shooting super macro.
For the best quality stills with any camera, a high intensity strobe will always give better results, however, they are larger and more expensive. For video, we normally recommend a minimum of 1200 lumens, so it’s dimmer most video lights.
I think the Kraken Weefine Ring Light is a small and relatively inexpensive ($229) lighting solution for macro photography, that produces decent results. Getting even, well-lit, super shots is effortless with it.
Friday, April 21, 2017
Micro 4/3rds vs. APS-C & Full-frame Cameras: Mexican Shootout or Standoff?
 |
| Nauticam E-M1 MKII vs. D800 - shown with fisheye dome ports. |
Underwater photographers have always debated their cameras and there are always questions and continuing debates about the virtues and performance of various formats.
We cover all of their pros and cons in our free Handbook: Choosing an Underwater Camera & Housing. But here's my experience.
 |
| Olympus E-M1 MKII |
Can a smaller, pro quality camera make up the distance with high quality optics and technology? Pretty much it was no contest for the end results; the image quality and performance (for stills anyway) is much better with a larger sensor camera like a D500 or D800. The deck was stacked against the smaller sensor format E-M1 MKII.
While the good news is that m4/3rds cameras are physically smaller; the bad news is their sensor is also smaller. Olympus and Panasonic (with Sony’s help), have continued to work miracles with the m4/3rds sensor, as well as its software, processors and SD card. However, the dynamic range of cameras like the E-M1 MKII, is lacking when compared to APS-C or full frame cameras like the D800. For video the smaller sensor works well; it gives a better crop and larger depth of field. Video focus with a larger sensor camera can be tricky.
 |
| Nikon D800 |
Shooting with a large sensor camera like the Nikon D800, allows me to really capture these dramatic scenes with far greater latitude, ease and quality. You just can’t put the same amount of information on a sensor that’s 4/3rds the size.
 |
| Nikon D800 |
Yes, the D800 is heavy and larger, but in the water, many of those issues go away with some flotation. Newer DSLR housings are becoming smaller and lighter as well.
Handling in the water isn’t that much different between them, dome size was the same. The E-M1 MKII is easier to navigate in tight places, particularly for macro or close focus/wide angle. Otherwise for bluewater reefscapes, the D800 isn't hard to handle, it just has more mass.
 |
| Nikon D500 |
However, I preferred to snorkel with my D800 in Mexico. Even though the Nikon can only shoot at 4 fps, all those frames are going to have a much richer exposure latitude and detail. When I review the images, I tend to go for that one shot that the Nikon D800 rendered perfectly, even in tough low-light conditions.
 |
| Nikon D500 |
I also much prefer the large bright optical viewfinders that DSLRs use. Focus is fast and accurate with no electronic blurs or problems with blow out in high key situations.
The E-M1 MKII electronic viewfinder is about the best I've seen. Their technology has improved and can offer features like focus peaking that colors the parts of the shot when sharp. Nikon has steadily refused to offer that feature.
 |
| Olympus E-M1 |
 |
| Olympus EM1 MKII |
Each has a place in my underwater photo toolkit, depending on the trip or type of shot I'm after. In the end, it's the images that are the bottom line.
Thursday, April 20, 2017
Olympus E-M1 MKII Underwater Housing Review Part 2: Nauticam NA-EM1MKII

Nauticam - Great Controls with Lots of Lens Choices
(Continued from Part 1)For my next trip to Cabo Pulmo and the Socorros Islands in Mexicos, I decided to take the new Nauticam E-M1MKII housing, along with my trusty Nauticam Nikon D800, and give them a bit of a wide angle shoot-out. Although there was a strange dearth of large animals, I did get good shots with both systems.


 The new Nauticam NA-EM1MKII housing has been given a good facelift to match the slightly thicker camera. Made from anodized aluminum and depth rated to 300'this is a much more serious type of housing for consumers and pros alike. Still a “junior” size to DSLRs, it now is slightly
larger than the previous model, with a more rounded shape. Controls are complete and larger where space permits. It’s been designed to be more in line with their current DSLR features such as a pull-out knob to disengage the zoom gearing, and a button at the front of the camera tray so that you can reset Nauticam’s electronic vacuum leak detector. It
has M14 and M16 bulkhead ports for a vacuum valve, electrical sync cord, or external monitor like the SmallHD. Overall, the housing seems quite rugged and well-laid out, typical to Nauticam’s designs. The Nauticam m 4/3rds system is mature, with many accessories and ports for both Olympus and Panasonic lenses.
The new Nauticam NA-EM1MKII housing has been given a good facelift to match the slightly thicker camera. Made from anodized aluminum and depth rated to 300'this is a much more serious type of housing for consumers and pros alike. Still a “junior” size to DSLRs, it now is slightly
larger than the previous model, with a more rounded shape. Controls are complete and larger where space permits. It’s been designed to be more in line with their current DSLR features such as a pull-out knob to disengage the zoom gearing, and a button at the front of the camera tray so that you can reset Nauticam’s electronic vacuum leak detector. It
has M14 and M16 bulkhead ports for a vacuum valve, electrical sync cord, or external monitor like the SmallHD. Overall, the housing seems quite rugged and well-laid out, typical to Nauticam’s designs. The Nauticam m 4/3rds system is mature, with many accessories and ports for both Olympus and Panasonic lenses.  One change to Nauticam’s latest mirrorless housings has the port for the eyepiece placed in the metal back of the housing, rather in the rear glass. In the past, you had to change the glass to a thicker version to accommodate an external viewfinder. Now you just need the MIL viewfinder, so it’s a less expensive option. One problem for upgraders from earlier Nauticam MIL housings is that the older DSLR viewfinders will now not fit the newer Nauticam MIL housings.
 I used the Olympus 7-14mm PRO lens quite a bit this time, as the same Zen 170mm DSLR dome port fits it (with an extension ring and port adapter), as well as my D800 for the 17-35mm f2.8 and Sigma 15FE lenses. I housed the 8mm PRO lens behind the sweet Nauticam 140mm N85 glass dome for a better port that would give less distortion in the corners and sides than the normal 4” acrylic ports.
 The Oly 7-14mm lens was great to use underwater, as it’s very adaptable for whatever shows up on a dive. I found myself using it at the both far and near ends of its range. At 7mm it’s nice for CF/WA, or larger reefscapes and wall shots, and at 14mm it can pull you closer to fish. Its bright f/2.8 speed allows for fast camera focus as well. With the 170mm dome port, N85 to N120 port adapter and 20mm extension, it’s not a small setup (or inexpensive). I used the Stix float belt on mid-range zoom lens setups like this, as it tucks behind the dome port over the longer extension and nicely balances the rig.
 I also really liked shooting the Nauticam housing with the Olympus 8mm PRO lens and the glass 140mm dome port. It’s small, and fantastic for low light, with a large f/1.8 native aperture. You can pretty much focus up the dome, so it’s perfect for CF/WA shots. But unless you are shooting large subjects, you must get close to fill its large field of view.
The Olympus hot-shoe flash that comes with the camera fits inside the housing, there is an optional manual LED trigger available, which is very fast, but lacks TTL, and only works with Inon, SS-2 and older Sea & Sea YS-D1 strobes – like many led triggers it won’t fire the latest Sea & Sea YS-D2 strobe due to it's weak sensor. In practice, I found using the Olympus flash inside the housing to recycle quickly, especially if the camera is used in manual mode and the duration set to 1/64th. It’s also nice to have TTL available for macro or close-up shots. So in several regards the standard flash is a good option.
Besides Nauticam and Olympus, look for many other manufacturers to produce E-M1 MKII housings. Subal, Ikelite, SEACAM all have offerings soon to be out on the market.
Baja Mexico Album:
Wednesday, April 19, 2017
Olympus E-M1 MKII Underwater Housing Review Part 1: PT-EP14 Housing
 The new Olympus OM-D E-M1 MKII has been the darling new camera lately, with high reviews from all corners for its improved feature set over the original E-M1. There is a lot to like: much faster AF with 121 focus points (especially in low-light), 20MP live MOS sensor, faster TruePic III processor, dual card slots, incredibly high-speed frame rate (18fps), better in-body image stabilization, 4K video, improved weather sealing, much larger battery (an issue with the original model), increased programmability with a (slightly) improved menu interface.
  High DxO sensor ratings show it just a shade under the Nikon D500 (reviewed here). The combination of a wide range of superb PRO lenses, fast speed, and incredibly rugged build quality has everyone thinking about this m4/3rds camera as the answer for a smaller, high performance underwater platform.
Would that actually be the case in real-life diving? I recently took it on two trips, under different conditions, to find out how I liked this smaller, high performance wunderkind SLR. On the first trip to Komodo National Park in Indonesia, I took the Olympus housing and several lenses for above and below water use.
 Komodo Island Expedition
I was able to get an early copy of the new OM-D E-M1 MKII camera and Olympus PT-EP14 polycarbonate underwater housing for our February trip to Komodo Park, Indonesia. I set up the Olympus housing with a couple of Sea & Sea YS-D1 strobes and a Kraken Hydra 5,000 lumen light. A lot has been previously written about the Olympus housings, and the engineers I met with at DEMA echoed the claims that they had made several advances in PT-14, notably its improved depth rating to 200’, and a much-better shutter release control lever. The interchangeable lens port lock is a standard rotating and locking ring and easy to work. The rest of the controls are well laid out and labeled, and the PT-14 housing is light and easy to travel with.
Photo opportunities on this trip were by and large macro: fish portraits and close-focus wide-angle shots. Visibility was poor most of the time, so I generally shot with the
 Olympus 60mm f2.8 lens. Olympus has come out with a new PPO-EP03 macro port for its housings that is much improved: smaller, with a threaded 67mm port to attach a macro diopter to (very useful to shorten focusing distances or increase image size). I tried out the new SagaDive TRIO macro diopter system with it. It worked like a champ, with 4 different image-size “gears” to shift to using its levers. This new macro port is a big improvement over the old PPO-EP01 flat port with its over-sized front ring; the only way to use a diopter was with a plastic clip-on adapter that frequently fell off and was awkward to store when not in use. I recommend the PPO-EP03 macro port if you have one of the Olympus OM-D housings, it's a lot easier to use.
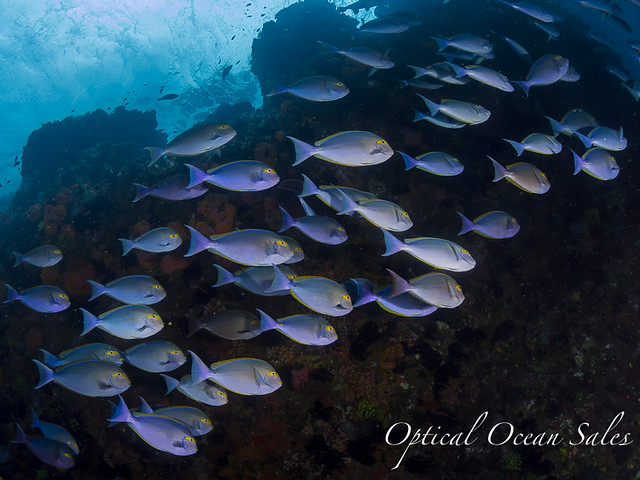
The Olympus 12mm rectilinear lens is very nice for stills and video, working well behind the same 4” dome port. One advantage of this lens is that it’s easy to add a red filter to the lens (inside the port) for video. It was great for shooting the manta rays we found, giving better reach and less distortion than the 8mm, without the expense and size of the 7-14mm (even if you could house it in the Olympus housing – which you can’t). Olympus slr photographers should give this tiny, sharp lens a look, as a small rectilinear lens that’s extremely fast and easy to shoot, particularly with the new video capabilities of the E-M1 MKII. The quality is excellent and the image stabilization works well.
 Results were pleasing for the most part. I liked having greater magnification, and the depth of field offered was much easier to work with than other larger format cameras. Compared to my experience with the older E-M1, I found the low-light AF much improved and the overall speed much faster. The longer battery life made a big difference as well; I could easily do 3, if not 4, dives on one battery.
I found this feature to be very useful to shoot tiny coral whip gobies. They tend to dart around, and when shooting them in high magnification, can be an exercise in frustration to get a good shot of. But with the C-AF+TR mode, you lock their little eyeballs in, and then wait for them (and you) to settle down into a good composition – all the while the camera is keeping their eyeballs in focus – and wham – you have the shot!
The Olympus PT-EP14 underwater housing, is a good quality product, but it is a consumer housing and lacks a lot of ports and features of the other brands. It is certainly improved over older models, but lacks port offerings for many of Oly’s great PRO wide angle lenses like the 7-14mm PRO. Controls are good, just not all that ergonomic. In the end, it’s high $1299 price will have most buyers looking at other offerings that have more features and options.
Continued on Part 2: Nauticam NA-EM1 II Housing
Friday, March 31, 2017
Komodo Trip Report: Biodiversity Amid Nature’s Fury
 (Or Hell Hath No Fury Like a Dragon Scorned)
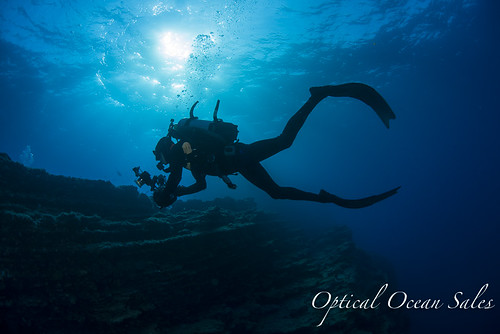
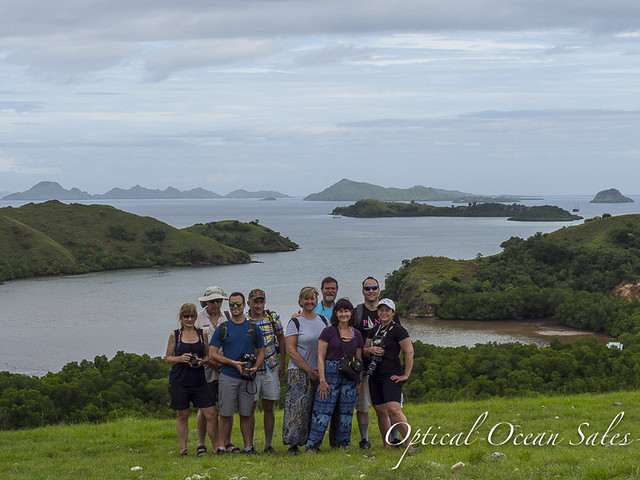
Komodo National Park lies near Bali, between East & West Nusa Tenggara islands in Indonesia. Our intrepid group of Optical Ocean Sales photographers managed to survive a cold wet season dive expedition there last February on the Damai 1 liveaboard boat.Cold and wet aren’t what usually comes to mind when thinking of Komodo, which is hot and dry most of the year. But during the short winter months things reverse. The north becomes cold and the south becomes warmer. Which can be fine; the southern sites are some of the best.
Except when there’s a typhoon blowing off the south of Australia. Then the area can all be very exposed. Which is what greeted us on and off during course of the trip.

Visibility in the water suffered at times, but good diving was found amid changing conditions of wind and rain. However, we were limited to where we could go.
 Denise and I managed to get colds on our layover in Bali, but the rest of the group started diving in Padar Bay. After that with a narrow weather window, we made our way south to the shelter of the south end of Rinca Island and anchored behind Pulau Kode doing multiple dives at Cannibal Rock, Torpedo Alley, Yellow Wall and Palau Pisang. We especially liked the good visibility we enjoyed at that site, pretty walls with lots of animals to photograph.
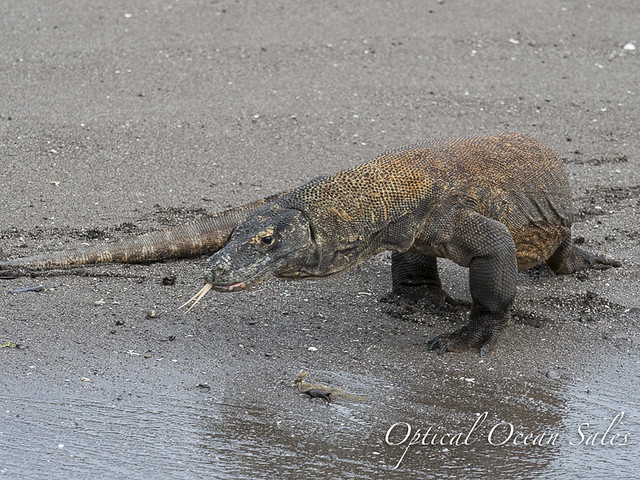
In the evening, we motored into the beach and (from the safety of the boats) we enjoyed watching the wild pigs, monkeys and Komodo Dragons. The dragons are huge, slobbering beasts, testing the air with their forked tongues as they slither across the sand. They are afraid of the pigs and it was funny to watch them run away when the pigs appeared.
As wet as it was, we were pampered by the Damai crew with amazing service, great food and comradery. The friendly crew would dress and undress us from our wetsuits, even taking the cameras from the individual rinse stations, drying them and returning them to the large camera room inside the boat. I dove with Indra, the son of a guide I had dove with in Raja Ampat on Damai II. He was just as good as his dad, and excelled in finding tiny nudibranchs, coleman shrimp and other small critters.

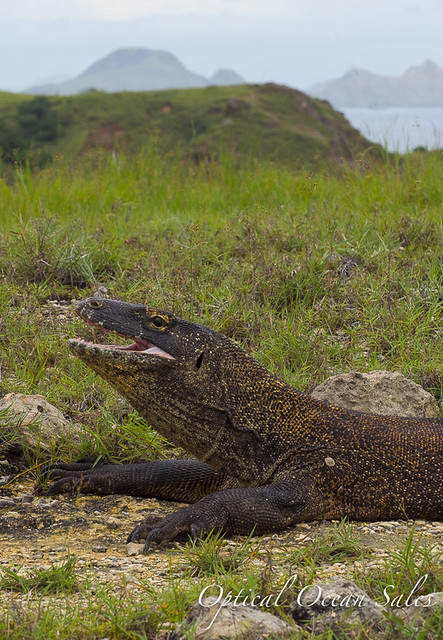 The next morning we took a boat ride and hike on Rinca Island to see Komodo National Park. A ranger led us along muddy trails to their station where the Komodo dragons hang out to eat leftover meal scraps. Although they are lazy, they can move very quickly – up to 40 mph! Our rangers kept a sturdy long forked stick to keep them away, but they weren’t necessary. I think the cooler weather kept them somewhat sleepy. We also set off on a cross country walk along the trail and encountered another smaller dragon along the way, yawning in the morning light.
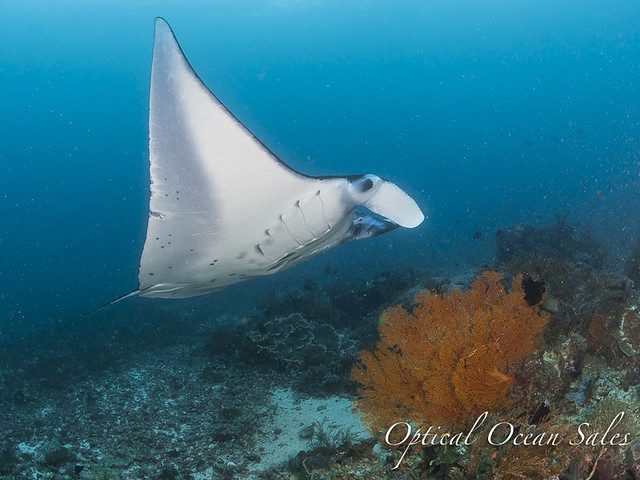
Back on the boat, we decided to go back and try for mantas in a clearer tide the next morning, but although the filming conditions were perfect, there were no mantas to be found. A second dive in hazy conditions was very successful. Mantas love to feed and one of the challenges in shooting them can be poor visibility from the swirls of krill they love to eat.
The next morning we took a boat ride and hike on Rinca Island to see Komodo National Park. A ranger led us along muddy trails to their station where the Komodo dragons hang out to eat leftover meal scraps. Although they are lazy, they can move very quickly – up to 40 mph! Our rangers kept a sturdy long forked stick to keep them away, but they weren’t necessary. I think the cooler weather kept them somewhat sleepy. We also set off on a cross country walk along the trail and encountered another smaller dragon along the way, yawning in the morning light.
Back on the boat, we decided to go back and try for mantas in a clearer tide the next morning, but although the filming conditions were perfect, there were no mantas to be found. A second dive in hazy conditions was very successful. Mantas love to feed and one of the challenges in shooting them can be poor visibility from the swirls of krill they love to eat.In deteriorating conditions, we went back to Padar Bay and did a few dives around that area over the next couple of days. The area was rich with lots of fish life and several giant frogfish, schools of surgeonfish, and lots of invertebrates.
 The last day we dove at a small protected island on the way back to Labuan Bajo, which was reported to have some mantas. Not seeing any, we had a long dive, but surfaced to crashing waves and high wind. Indeed, a small fishing boat had sunk and our guide Gusti had spotted the 3 poor fishermen in the water and rescued them while we were down. They were very lucky as it was a remote spot, and they were in the water 3 hours before he spotted them!
All in all, it was a good dive trip, but if I had to go back I would go in late spring when the weather is better. For an incredible diversity of life, Komodo is hard to beat.
-------
Photo Notes: On this trip, I shot the new Olympus E-M1 MKII camera in their PT-EP14 housing. I shot the 8mm FE Pro lens, 60mm macro and for a different look - the 12mm f2.0 lens. The new Olympus PPO-PP03 macro port worked very well with the 60mm macro lens along with SagaDive’s new TRIO switchable diopter. Switching between 3 powers of magnification on the fly made life easy when Indra found a teeny nudi to challenge me my abilities.
I also tried out the Olympus TG-4 with the new Kraken (Weefine) 1000 lumen ring light. I could then set up the larger Oly for wide angle and use the small TG-4/ringlight setup for macro. The best of both worlds!
Wednesday, January 25, 2017
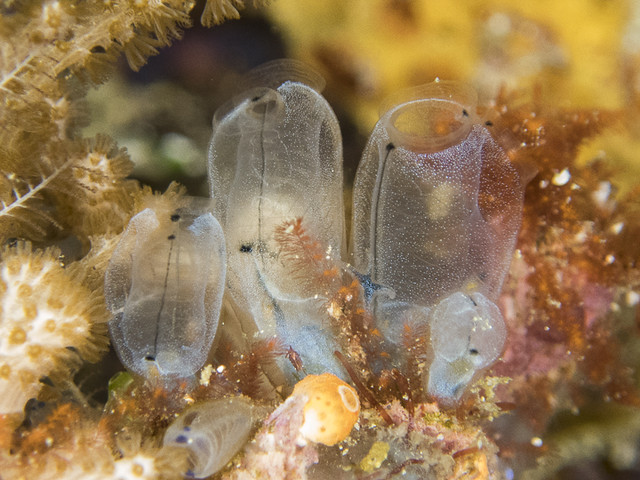
Lembeh Low Down & Review of the MDX-D500, Olympus E-M1
Optical Ocean Sales Trip Report - Dive into Lembeh Resort, Oct. 2016
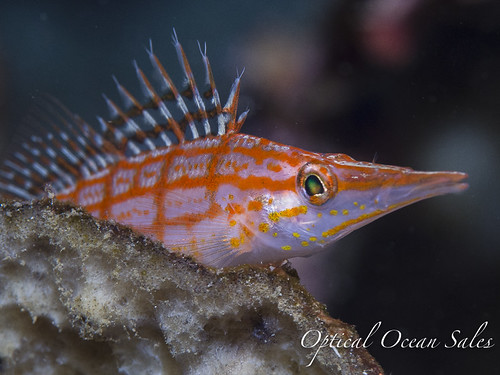
 We came, we saw, we took photos, and more and more photos of an amazing variety of small underwater critters at Lembeh Straits, Indonesia last October on the Optical Ocean Sales Photo Expedition there.
 Lembeh is an area centered around the town of Bintung, at the north end of North Sulawesi Island. With 8,000’ deep drop-offs nearby, pumping huge amounts of plankton into the area, it harbors and fosters one of the highest bio-diversities of marine life found anywhere on the planet.
 Staying at the lovely, new Dive Into Lembeh Resort at Hairball, our group of 16 found so many unique animals in our viewfinders that it was hard to keep up with the amazing sightings.
 It seemed like everything we discovered was a “Pigmy” or “Hairy” as well; Pigmy Filefish, Seahorses, Cuttlefish; Hairy Frogfish, Octopus, Shrimp - all found their way onto our memory cards. Small, delicate, and incredible, there were amazing finds on almost every dive. Lembeh Straits is truly a macro photographer's paradise.

Dive into Lembeh is a new resort from the same folks who run Dive into Ambon, and has been designed for comfort amidst the jungle-like setting of North Sulawesi. We were two to a cabin, scattered along the sloping landscaped waterfront, with a beautiful pool, spa and dining room. The bungalows were spacious and well-designed, with plenty of room; a large queen or two single beds and roomy bathroom with walk-in shower. Although luxurious, we were reminded where we were when a humongous jungle spider greeted us from the mirror during our morning shave, or bats flew through the dining room having their dinner along with ours. But coming back from a dive, we could jump into our cabin’s heated Japanese onsen soaking tub and all concerns melted away.
 Our huge amount of camera gear demanded good facilities, and we were not disappointed. The camera room and rinse tanks were well laid-out, with individual stations and large table with plenty of room to spread out. Our group enjoyed helping each other, sharing tools, tips and help, along with gear and stories of the “that’s nice, but I got one that’s better” conversations. Jealousy raged, replaced by pride, in what each photographer accomplished during their 12 days of diving.
Diving was from the resort’s three new dive boats, which were fast and comfortable. No dive site was more than 10-15 minutes away. The diving center has a nice dressing room and separate gear rinsing stations. The dives were well-organized and run, and all the resorts along Lembeh have an agreement not to have more than two boats on a site, so that we could enjoy our dives without feeling crowded.
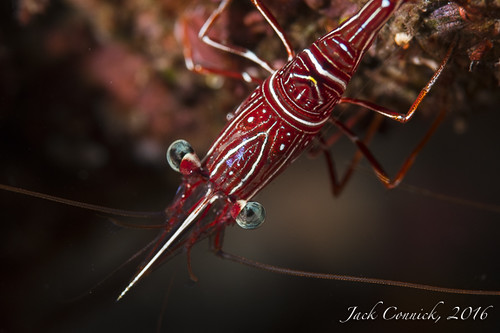
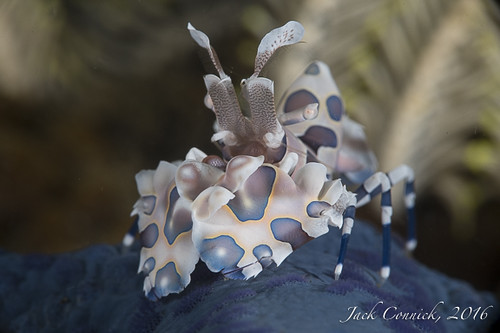
 Our guides were experienced and had the “eyes of an eagle”, finding the tiny “pigmy” animals that none of us could see without careful attention to what was pointed out to us. They also knew where some rare animals lived, such as the beautiful Harlequin Shrimp, color matched and perched on the blue starfish they love to eat. All of the guides were careful not to disturb, move, or offer us un-realistic animal situations. Even though I’ve done previous diving there, I was shown new and interesting sites, caves, walls and drift dives along the walls. The house-reef Hairball has an interesting flat area melting into a nice wall along the shore. It offered plenty of good diving and was also a good night-dive, with easy access from shore. We had to be careful getting out of the boat, as some large seahorses were resident right at the boat moorings!
 About the only negative to the diving was the large amount of trash in the water. At low tide it was a thick mass, and I surfaced once with a large wad of plastic and paper wrapped over my head.
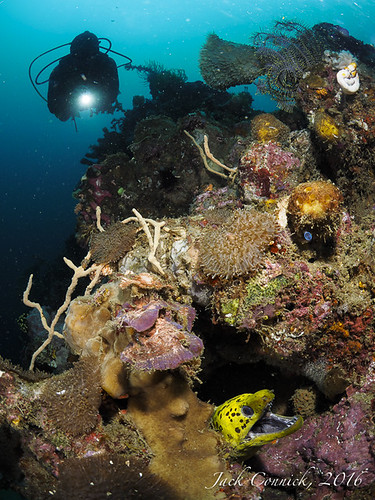
 I have to admit that while I enjoy shooting macro photos, I do love shooting wide angle just as much. With a little prompting, a few of us had our guides take us on some nice drift dives along Nudi Retreat and Nudi Falls to take photos of the beautiful, colorful walls there. Soft coral, anemones and other invertebrates of every hue hid fish and other small critters that gave us opportunities to to test our wide angle photo skills.
I was shooting two different camera rigs: a new Nikon D500 DSLR in a Sea & Sea MDX-D500 housing, and an Olympus E-M1 m 4/3rds SLR in an Olympus housing.
 The D500 has an amazing macro platform with autofocus, bright viewfinder, and low-light abilities that are perfect for this type of shooting. I found it wasn’t hard to capture multiple shots of a baby squid in focus with its proboscis darting in and out to feed on plankton. It is extremely fast to use, with its quick frame-rate and fast release, but it takes some getting used to, as the menu setup details on it is different than any other Nikon DSLR I’ve used before, from D80 to D800. It is much more electronic, and in my opinion, a cross between old-school DSLRs and the more electronic mirrorless SLRs like the E-M1.
 I believe in shooting the best tools available, even if it’s a non-OEM configuration. I had setup the Sea & Sea MDX-D500 housing with a Nauticam 180 viewfinder, along with a flip macro diopter holder, diopters and a SagaDive 100mm dome port. I used the Nikon 60mm, 105mm VR, and a dive or two with the Tokina 10-17mm FE lenses.
 The MDX-D500 housing was a prototype, and the new version of Sea & Sea’s optical strobe trigger wasn’t available yet. With some testing, I was able to use a trigger from a D7100 in manual mode, which certainly beats using an electronic sync cord.
Controls were laid out fairly well, although I didn’t realize there is an adjustable 3 position shutter release, which would've helped if adjusted. I would also remove the AF lock button, as it’s not necessary if you set up the “lock button with press” in the menu. I liked the “glow in the dark” control labels. Overall the Sea & Sea housing performed very well and was comfortable, fast, and easy to setup and use.
 My friend Jeff was using his new Nauticam D500 housing, and one thing that happened to both of us was that even the very slight pressure of resting a finger on the shutter release would cause the photo review to not work. It was frustrating, until we figured it out. You definitely want to find another finger resting position than on the shutter release on the D500.
The Nikon D500 shoots great video, and I set the rig up with a Kraken Sports 5000 lumen video light. It was easy to switch between stills and video. The quality of the footage with the Kraken’s bright white light was excellent - if I could keep it in focus - not easy with a macro lens. I’d use some sort of tripod next time.
 I also shot the Olympus E-M1, and I have to say it was surprisingly fast to shoot. It auto-focused quickly when used with the Kraken 5000 as a focus light. Shutter release on it is slower, but along with accurate D-TTL exposure with the Sea & Sea YS-D1 strobes, I got quite a few keepers with the sharp Olympus 60mm macro and an external +5 macro diopter lenses.
 When we dove the walls, the Olympus 8mm FE PRO lens showed its stripes as a stand-out, high-quality wide angle lens. It allowed me to set up subjects in the foreground and background amidst the colorful environment and get all in focus and working together.
 |
| Larry Collison's 1st Place Photo |
All in all, the group had a great time in Lembeh Straits and we enjoyed sharing images a few nights after dinner, oohing and awning at each other’s discoveries and creativity. On the last night we had a small photo contest, and two of the winners voted by the group were taken by Larry Collison with an Olympus TG-4 point and shoot and a Sea & Sea YS-03 strobe package! It made us remember that it’s not the camera, it’s the photographer!
Subscribe to:
Posts (Atom)