Saturday, April 22, 2017

Review: Kraken Weefine Underwater Photo Ring Light

The latest offering from Kraken Sports is the WeeFine Ring Light for macro illumination. This innovative light attaches to any threaded port and is similar to ring flashes using strobe lights that have been on the market for a while. However, it features a constant-on 1000 lumen light and is small, lightweight and self-contained. As with all Kraken Sports products, build quality is excellent, with an even, high-quality output and well-designed anodized construction.

This light is intended for very close-up use. It has a nicely beveled center section that tapers to allow you to put the light over small subjects without hitting them. The battery holder and light swivels on the center section, so you can flip it around out of the way during the dive. By using step up rings, you can attach the light to almost any threaded port. I used it with both an Olympus PT-EP14 (67mm) and TG-4’s PT-056 (52mm) housing easily.

It’s 1000 lumen output has three power settings, and comes with a standard 18650 lithium battery and cradle charger. The switch bezel uses colored lights to tell you the remaining battery strength.

The Weefine Ring Light’s small, self-contained size, and nearly neutral weight, make it ideal for a macro camera rig with bright illumination that is “plug and shoot”, it’s as easy to use as taking photos above water.

On our recent Komodo Park dive trip, I shot it with the Olympus E-M1 MKII in the Olympus PT-EP14 housing and 60mm macro lens. One limitation I ran into is that you cannot add or remove a macro diopter lens underwater. You have to decide above water how much magnification you want to use. I used a +5 diopter, but it might be better to use a +10 or greater and shoot super macro.

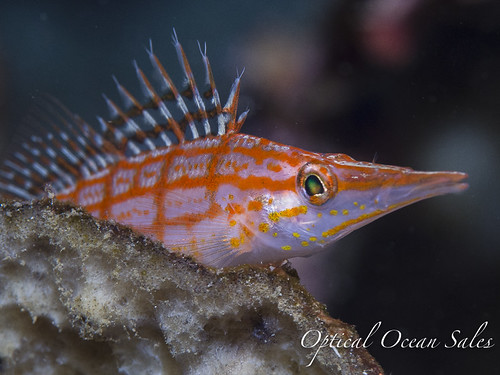
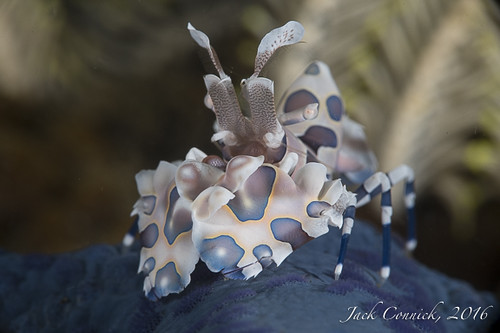
There has been a lot written about taking photos using constant-on lights. The issue is not only lumen output, but longer exposures. Strobes are designed to put out a tremendous amount of light instantaneously that freezes motion and gives rich color saturation. A light just doesn’t give the same effect, unless it is very powerful and is used close enough that the color of the water doesn’t affect color temperature. By my eye photos taken with a light as compared to strobes look a bit soft and flat.

I found that on the Olympus E-M1 MKII slr,  the 1000 lumen power was weaker than I'd like to see for reasonable exposures. I had to use high ISOs along with slow shutter speeds for proper exposure, so image quality and sharpness suffered. Of course the smaller the subject matter the closer you can get and the better the exposures.

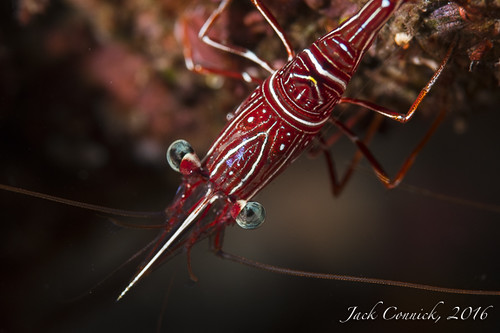
The ring light’s small size and constant exposure made shooting very quick. I got some good shots of a quickly moving small Wonderpus by being able to move in quickly and use the fast frame rate of the E-M1 without waiting for a strobe to recycle.

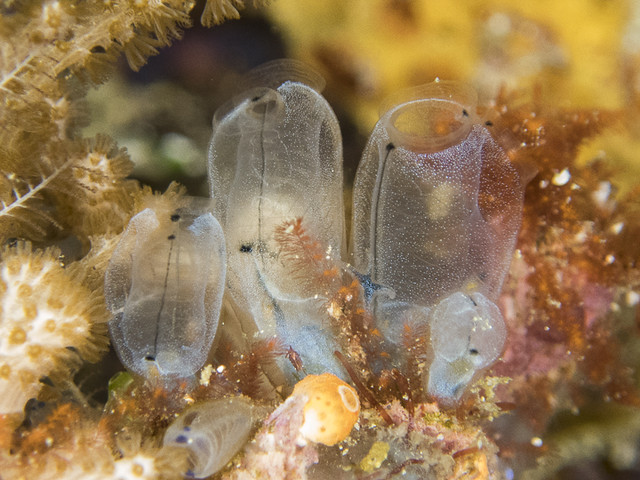
Light quality using any ring light is even and flat. This makes the Kraken ideal for scientific captures without shadows, but it’s not a creative lighting source that could add shadows and depth. Trying to tilt it one way or the other just made the shot evenly underexposed on one side.

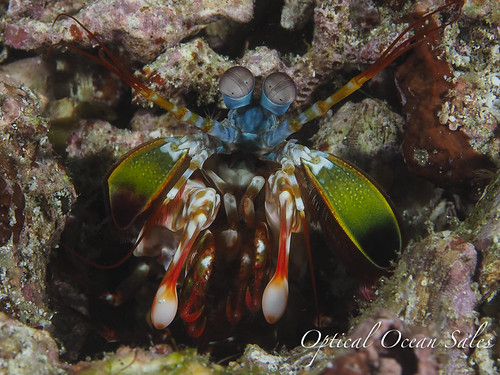
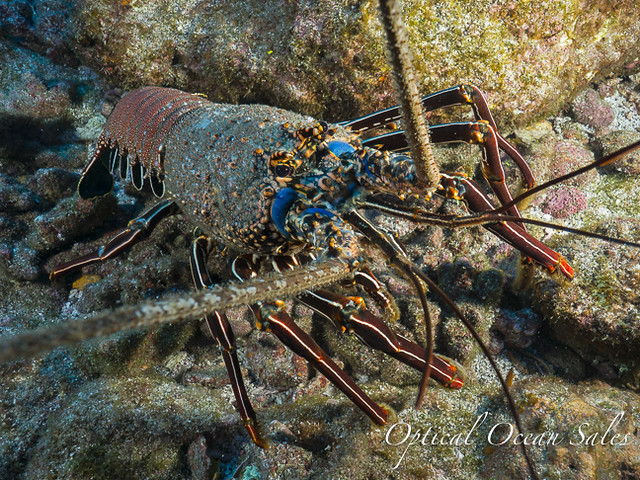
I also shot the ring light with an Olympus TG-4 compact. This camera is well-known for its exceptional macro capability. It has a built-in strobe for macro, but the camera’s Super Microscope mode, that normally uses an LED light on the camera for illumination, is not available when inside a housing. The Kraken Ring Light works great as a substitute.

With the Kraken Weefine Ring Light, the TG-4 really came into its own for super macro photos. I used it in Program mode and selected a high aperture. It seemed to work better than the high-resolution E-M1, with a greater exposure latitude.

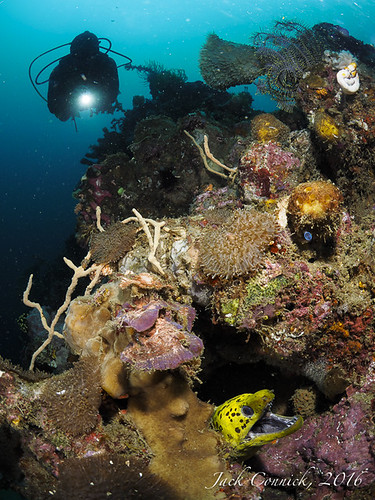
What was nice was that I could carry both two cameras together on a dive. The TG-4 and ring light was so small that I could clip it out of the way, while using the larger E-M1 strobe rig for wide angle, and then be able to switch to the TG4 for macro shots. I could easily place into tight spots that the bigger camera couldn't reach.

You can use the TG-4 to shoot more normal shots but you can't zoom all the way out to the widest lens setting. As such also you cannot use underwater Wide 1 mode which fixes zoom. The ring light obviously wouldn't work for illumination for those types of shots. The constant-on light would also be good for macro video use, although I didn’t get a chance to test it.

To get modest exposure times, I had to use the light on full power. I was only using a standard 1100mha battery on a prototype unit. As such, battery run time on the light was problematic.  Even turning it down between shots, I could only get 35 to 40 minutes from the light. This should be improved on the production model as Kraken will ship the light with a larger capacity battery.

In the end, I found that at 1000 lumens it’s not strong enough for slrs without compromising image quality unless shooting super macro.

For the best quality stills with any camera, a high intensity strobe will always give better results, however, they are larger and more expensive. For video, we normally recommend a minimum of 1200 lumens, so it’s dimmer most video lights.

I think the Kraken Weefine Ring Light is a small and relatively inexpensive ($229) lighting solution for macro photography, that produces decent results. Getting even, well-lit, super shots is effortless with it.

Kraken Ringlight Macro

Friday, April 21, 2017

Micro 4/3rds vs. APS-C & Full-frame Cameras: Mexican Shootout or Standoff?

Nauticam E-M1 MKII vs. D800 - shown with fisheye dome ports.
(Continued from Part 2)
Underwater photographers have always debated their cameras and  there are always questions and continuing debates about the virtues and performance of various formats.

We cover all of their pros and cons in our free Handbook: Choosing an Underwater Camera & Housing. But here's my experience.

Olympus E-M1 MKII
With airline travel restrictions and costs increasing, the desire of most divers is for a smaller, more capable system. They want to be able to have their cake and eat it too. But are the smaller sensor format cameras that good or that small in the end?

Can a smaller, pro quality camera make up the distance with high quality optics and technology? Pretty much it was no contest for the end results; the image quality and performance (for stills anyway) is much better with a larger sensor camera like a D500 or D800. The deck was stacked against the smaller sensor format E-M1 MKII.

While the good news is that m4/3rds cameras are physically smaller; the bad news is their sensor is also smaller. Olympus and Panasonic (with Sony’s help), have continued to work miracles with the m4/3rds sensor, as well as its software, processors and SD card. However, the dynamic range of cameras like the E-M1 MKII, is lacking when compared to APS-C or full frame cameras like the D800. For video the smaller sensor works well; it gives a better crop and larger depth of field. Video focus with a larger sensor camera can be tricky.

Nikon D800
With the E-M1 MKII, I found it very hard to shoot a nice reefscape with a brighter surface (let alone sunball), with the blues transitioning from dark to light for instance. Surface water would band into cyan, even at f/8. Yes, it would work, if you shot at a low ISO, with a higher shutter speed and aperture (f/13 or so), and then turned up your strobes. But in a place like Socorro, which is darker and has reefs that are large, it became problematic to try to light.

Shooting with a large sensor camera like the Nikon D800, allows me to really capture these dramatic scenes with far greater latitude, ease and quality. You just can’t put the same amount of information on a sensor that’s 4/3rds the size.

Nikon D800
When traveling with a DSLR, you can have two ports and a couple of extensions to house four or more lenses – so packing isn’t that bad. Micro 4/3rds lens optics tend to require a port for each lens – so there’s more ports to buy and pack, even if they’re smaller.  So that must be factored.

Yes, the D800 is heavy and larger, but in the water, many of those issues go away with some flotation. Newer DSLR housings are becoming smaller and lighter as well.

Handling in the water isn’t that much different between them, dome size was the same. The E-M1 MKII is easier to navigate in tight places, particularly for macro or close focus/wide angle. Otherwise for bluewater reefscapes, the D800 isn't hard to handle, it just has more mass.

Nikon D500
The Nikon D800’s image quality and focusing performance is far superior. The E-M1 MKII has a much faster 18fps frame rate. For those who are free-diving and staying either deep, or shallow, where you can balance the lighting easier, the m4/3rds camera work out well, especially with the E-M1 MKII’s smaller handling size.  So there are tradeoffs both ways.

However, I preferred to snorkel with my D800 in Mexico. Even though the Nikon can only shoot at 4 fps, all those frames are going to have a much richer exposure latitude and detail. When I review the images, I tend to go for that one shot that the Nikon D800 rendered perfectly, even in tough low-light conditions.

Nikon D500
A smaller newer, DSLR such as the Nikon D500, has many of the best qualities of both. It's smaller, with a fast frame rate and great low-light performance, with lots of lenses and small dome ports you can use. Depth of field is great for macro and low-light auto-focus is extremely fast - it literaly can see in the dark.

I also much prefer the large bright optical viewfinders that DSLRs use. Focus is fast and accurate with no electronic blurs or problems with blow out in high key situations.

The E-M1 MKII electronic viewfinder is about the best I've seen. Their technology has improved and can offer features like focus peaking that colors the parts of the shot when sharp. Nikon has steadily refused to offer that feature.

Olympus E-M1
I admit, even after several trips with Olympus E-M1 and PEN cameras, I have a love-hate relationship with the m4/3rds format.

Olympus EM1 MKII
I love their programmability, high-quality lenses, handling and travel size, and the fact that they work faster and easier for macro. I enjoy shooting them topside, they're rugged and light to carry with a plethora of shooting features. But in the end I prefer the image quality and dynamic range of the APS-C and full-frame cameras.

Each has a place in my underwater photo toolkit, depending on the trip or type of shot I'm after. In the end, it's the images that are the bottom line.

Thursday, April 20, 2017

Olympus E-M1 MKII Underwater Housing Review Part 2: Nauticam NA-EM1MKII

Nauticam - Great Controls with Lots of Lens Choices

(Continued from Part 1)
For my next trip to Cabo Pulmo and the Socorros Islands in Mexicos, I decided to take the new Nauticam E-M1MKII housing, along with my trusty Nauticam Nikon D800, and give them a bit of a wide angle shoot-out. Although there was a strange dearth of large animals, I did get good shots with both systems.

The new Nauticam NA-EM1MKII housing has been given a good facelift to match the slightly thicker camera. Made from anodized aluminum and depth rated to 300'this is a much more serious type of housing for consumers and pros alike. Still a “junior” size to DSLRs, it now is slightly larger than the previous model, with a more rounded shape. Controls are complete and larger where space permits. It’s been designed to be more in line with their current DSLR features such as a pull-out knob to disengage the zoom gearing, and a button at the front of the camera tray so that you can reset Nauticam’s electronic vacuum leak detector. It has M14 and M16 bulkhead ports for a vacuum valve, electrical sync cord, or external monitor like the SmallHD. Overall, the housing seems quite rugged and well-laid out, typical to Nauticam’s designs. The Nauticam m 4/3rds system is mature, with many accessories and ports for both Olympus and Panasonic lenses.

One change to Nauticam’s latest mirrorless housings has the port for the eyepiece placed in the metal back of the housing, rather in the rear glass. In the past, you had to change the glass to a thicker version to accommodate an external viewfinder. Now you just need the MIL viewfinder, so it’s a less expensive option. One problem for upgraders from earlier Nauticam MIL housings is that the older DSLR viewfinders will now not fit the newer Nauticam MIL housings.

I used the Olympus 7-14mm PRO lens quite a bit this time, as the same Zen 170mm DSLR dome port fits it (with an extension ring and port adapter), as well as my D800 for the 17-35mm f2.8 and Sigma 15FE lenses. I housed the 8mm PRO lens behind the sweet Nauticam 140mm N85 glass dome for a better port that would give less distortion in the corners and sides than the normal 4” acrylic ports.

The Oly 7-14mm lens was great to use underwater, as it’s very adaptable for whatever shows up on a dive. I found myself using it at the both far and near ends of its range. At 7mm it’s nice for CF/WA, or larger reefscapes and wall shots, and at 14mm it can pull you closer to fish. Its bright f/2.8 speed allows for fast camera focus as well. With the 170mm dome port, N85 to N120 port adapter and 20mm extension, it’s not a small setup (or inexpensive). I used the Stix float belt on mid-range zoom lens setups like this, as it tucks behind the dome port over the longer extension and nicely balances the rig.

I also really liked shooting the Nauticam housing with the Olympus 8mm PRO lens and the glass 140mm dome port. It’s small, and fantastic for low light, with a large f/1.8 native aperture. You can pretty much focus up the dome, so it’s perfect for CF/WA shots. But unless you are shooting large subjects, you must get close to fill its large field of view.

The Olympus hot-shoe flash that comes with the camera fits inside the housing, there is an optional manual LED trigger available, which is very fast, but lacks TTL, and only works with Inon, SS-2 and older Sea & Sea YS-D1 strobes – like many led triggers it won’t fire the latest Sea & Sea YS-D2 strobe due to it's weak sensor. In practice, I found using the Olympus flash inside the housing to recycle quickly, especially if the camera is used in manual mode and the duration set to 1/64th. It’s also nice to have TTL available for macro or close-up shots. So in several regards the standard flash is a good option.

Besides Nauticam and Olympus, look for many other manufacturers to produce E-M1 MKII housings. Subal, Ikelite, SEACAM all have offerings soon to be out on the market.

Baja Mexico Album:E-M1 MKII in Mexico

Wednesday, April 19, 2017

Olympus E-M1 MKII Underwater Housing Review Part 1: PT-EP14 Housing

The new Olympus OM-D E-M1 MKII has been the darling new camera lately, with high reviews from all corners for its improved feature set over the original E-M1. There is a lot to like: much faster AF with 121 focus points (especially in low-light), 20MP live MOS sensor, faster TruePic III processor, dual card slots, incredibly high-speed frame rate (18fps), better in-body image stabilization, 4K video, improved weather sealing, much larger battery (an issue with the original model), increased programmability with a (slightly) improved menu interface.

High DxO sensor ratings show it just a shade under the Nikon D500 (reviewed here). The combination of a wide range of superb PRO lenses, fast speed, and incredibly rugged build quality has everyone thinking about this m4/3rds camera as the answer for a smaller, high performance underwater platform.

Would that actually be the case in real-life diving? I recently took it on two trips, under different conditions, to find out how I liked this smaller, high performance wunderkind SLR. On the first trip to Komodo National Park in Indonesia, I took the Olympus housing and several lenses for above and below water use.

Komodo Island Expedition

I was able to get an early copy of the new OM-D E-M1 MKII camera and Olympus PT-EP14 polycarbonate underwater housing for our February trip to Komodo Park, Indonesia. I set up the Olympus housing with a couple of Sea & Sea YS-D1 strobes and a Kraken Hydra 5,000 lumen light.

A lot has been previously written about the Olympus housings, and the engineers I met with at DEMA echoed the claims that they had made several advances in PT-14, notably its improved depth rating to 200’, and a much-better shutter release control lever. The interchangeable lens port lock is a standard rotating and locking ring and easy to work. The rest of the controls are well laid out and labeled, and the PT-14 housing is light and easy to travel with.

Photo opportunities on this trip were by and large macro: fish portraits and close-focus wide-angle shots. Visibility was poor most of the time, so I generally shot with the
Olympus 60mm f2.8 lens. Olympus has come out with a new PPO-EP03 macro port for its housings that is much improved: smaller, with a threaded 67mm port to attach a macro diopter to (very useful to shorten focusing distances or increase image size). I tried out the new SagaDive TRIO macro diopter system with it. It worked like a champ, with 4 different image-size “gears” to shift to using its levers. This new macro port is a big improvement over the old PPO-EP01 flat port with its over-sized front ring; the only way to use a diopter was with a plastic clip-on adapter that frequently fell off and was awkward to store when not in use. I recommend the PPO-EP03 macro port if you have one of the Olympus OM-D housings, it's a lot easier to use.
I also took the opportunity to try out the 8mm f/1.8 FE PRO and 12mm f/2.0 lenses behind the Olympus 4” PPO-EP02 dome port. The 8mm is one of my favorites for deep-water wide-angle photography. I’ve used it in the Solomons for wrecks and close focus, but in Komodo, I enjoyed shooting schools of fish, soft coral, as well as close focus with good results.

The Olympus 12mm rectilinear lens is very nice for stills and video, working well behind the same 4” dome port. One advantage of this lens is that it’s easy to add a red filter to the lens (inside the port) for video. It was great for shooting the manta rays we found, giving better reach and less distortion than the 8mm, without the expense and size of the 7-14mm (even if you could house it in the Olympus housing – which you can’t). Olympus slr photographers should give this tiny, sharp lens a look, as a small rectilinear lens that’s extremely fast and easy to shoot, particularly with the new video capabilities of the E-M1 MKII. The quality is excellent and the image stabilization works well.

Results were pleasing for the most part. I liked having greater magnification, and the depth of field offered was much easier to work with than other larger format cameras. Compared to my experience with the older E-M1, I found the low-light AF much improved and the overall speed much faster. The longer battery life made a big difference as well; I could easily do 3, if not 4, dives on one battery.

I tried using the C-AF+TR focus setting for macro, which uses continuous auto focus and but also allows focus tracking. As your subject moves around, it continues to focus where you locked it. This was available on the original E-M1, but the speed was lacking.

I found this feature to be very useful to shoot tiny coral whip gobies. They tend to dart around, and when shooting them in high magnification, can be an exercise in frustration to get a good shot of. But with the C-AF+TR mode, you lock their little eyeballs in, and then wait for them (and you) to settle down into a good composition – all the while the camera is keeping their eyeballs in focus – and wham – you have the shot!

The Olympus PT-EP14 underwater housing, is a good quality product, but it is a consumer housing and lacks a lot of ports and features of the other brands. It is certainly improved over older models, but lacks port offerings for many of Oly’s great PRO wide angle lenses like the 7-14mm PRO. Controls are good, just not all that ergonomic. In the end, it’s high $1299 price will have most buyers looking at other offerings that have more features and options.


Continued on Part 2: Nauticam NA-EM1 II Housing

Translate