Friday, February 27, 2015

Raja Ampat: Nothing More Needs to Be Said.

Raja Ampat in Indonesia, has always held a lot of fascination for me. Customers on their way there, or just back, were awestruck by the area. “Best in the diving in the world!” they’d say, but having dove for many years, I’ve heard that before…

After several days of long flights and airline frustrations,  I was on the Damai II steaming down the straits in Raja, after a wonderful late-afternoon dive full of vibrant undersea life by Batanta Island, I was getting a massage, drinking a Bintang beer, and enjoying the sunset. I reflected that all of these divers’ comments were right! It was pretty hard to beat!

Over the next 10 days, eleven divers on the Optical Ocean Sales Photo Expedition concentrated their dives in the southern Misool area of Raja, as there had been wind and rain in the north. This is common in many areas in Indonesia, given that dive sites are so spread out; if the weather is bad in one place, another is fine.

The Damai specializes in small dive groups, so we were spread out amongst 3 boats. I ended up staying with one guide, Salim, diving with another couple of divers who rotated through. The other divers tended to go their own way a lot, so Salim and I ended up diving closely together most of the time.

I’ve been diving with literally hundreds of other divers over the years, some are just fine, others you tend to have communication or other issues with. Human nature I guess. Salim and I settled into an easy rhythm.

He spoke English, but we didn’t talk much between dives, other than to ID some weird nudibranch I’d never seen before, or to help him set up a GoPro he found on a dive. But we communicated underwater without difficulty, knowing what the other wanted, or where the other person was without guessing. During the course of some 30 odd dives spread out over 440 miles, there was no fuss, no muss. If we had a problem like my tank coming loose, we just dealt with it in a relaxed and purposeful manner. If I ran low on air at the safety stop, I’d grab his spare octo, without either of us even taking much notice.

I used him many times as a model, and he was eager to learn, picking up on my directions easily. He loved to see the shots of himself and tried hard to improve his positioning. I could concentrate on my photography without worry. He always showed me great wide angle options, and was a master at pointing out macro critters as well. We’d get excited about a rare find and shared that enthusiasm underwater as I took photos. The unspoken communication between experienced divers was easy and robust.

Misool has a great many world-class dive sites. Even though the visibility was limited in places, we had calm seas and very good diving. The sheer variety of the dives was amazing; muck dives, reef dives, drift dives, caves, undercuts, canyons, fans, soft coral and acres of hard coral - all were there and almost always surrounded by great masses of fish. The schools were so thick it actually was somewhat frustrating; “Can somebody get the fish out of the way, so I can take a shot of the other fish?”
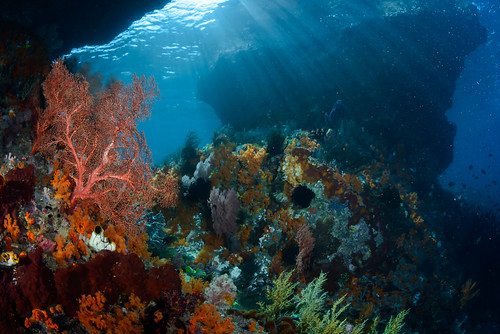
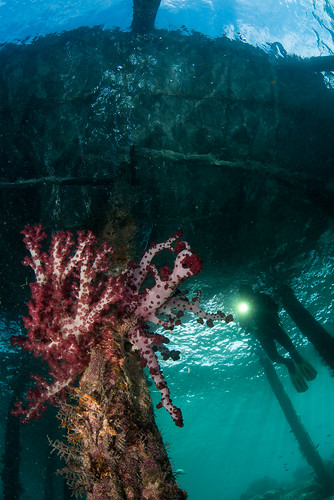
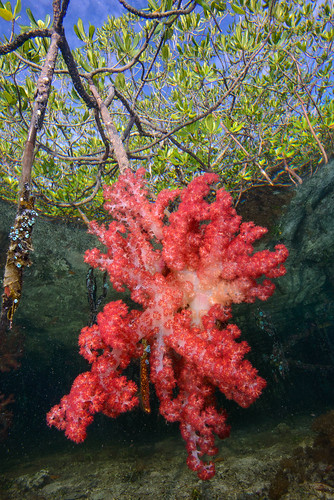
And there were special places like the Blue Water Mangroves at Nampale Island, where gorgeous soft coral grew in 2 feet of shallow water. Or Window Rock, with the afternoon light streaming in onto fans and soft coral. Or the huge schools of barracuda, snapper, and many other fish that challenged Salim and myself to move in close enough with them for photos.

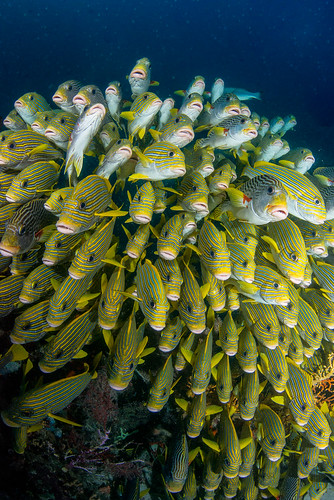
Moving to the north Dampier Straits area, the weather improved, but the visibility was more limited. Still, we had excellent diving - muck dives at Deer/Kofiau Islands, with wonderful afternoon lighting at famous Arborek Jetty. On a deep dive off Blue Magic, Salim showed me a few white tip sharks. As we went along the edge of the slope at 120’, we found a huge ball of hundreds of Sweet Lips, packed tightly together over a rock.
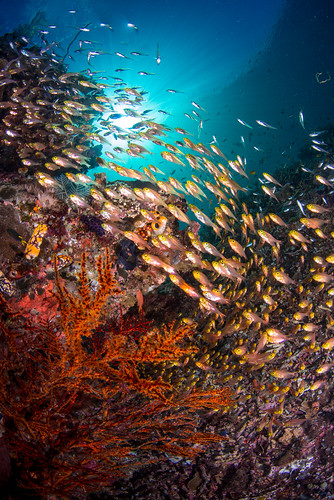
Riding the current, I swam through them several times to take photos and they quickly regrouped tightly around me back into their school. Low on gas, and without much more than a quick fist pump to my chest, Salim led me back up the slope behind coral outcroppings to do deco and a safety stop.

On our last day, we opted for a dive at Cape Kri. It wasn’t that impressive sort of a lot of rubble on a hillside, and I struggled to find something interesting to shoot. But then, at the end of the dive, in shallow water, was a bommie with fans and a huge school of glass fish swarming all over it. With the early morning sun streaming through clear, calm water I was able to take one of my favorite shots of the trip.

Sometimes you just have to keep on shooting and trust that things will work out. No need to talk about it.

Realize Your UW Vision This Spring!

We're stocking lots of great new underwater photo products that have recently come out this Spring. New housings for the latest cameras, more powerful and easier-to-use lighting, and cool new accessories to make your underwater life easier! We've added fun new Photo Expeditons as well as many more new FREE Handbooks and Articles to the Resource Center! Call 800-359-1295 or email the experts at Optical Ocean Sales if want a new answer!

Underwater Photo
New from Nauticam!

NauticamNA-7DMKII Housing Canon has done it again and updated a classic DSLR with the new 7D Mark II, and Nauticam has out-done themselves with the NA-7DMKII housing. Like all their latest models, a multi selector pad, features include a vacuum leak detection system now with a reset button accessible from the front port opening, integrated latches, larger knobs, and a lighter weight. Added to these now standard features are ergonomic refinements like a new dual function lever under the right handle brings ISO and M Fn (used for AF area pattern) right under the fingertips of the user.
Nauticam LX-100 Housing
NA-LX100 Housing Also new from Nauticam is the NA-LX100 housing for the new prosumer Panasonic LX-100 compact camera. This imaging marvel packs an amazing array of features, and is capable of extremely high quality, DSLR-sharp shots on it's large four-thirds sensor. Nauticam N50 PortsBut the topper is that it can shoot ultra high definition 4K video! Nauticam has fully supported the camera with a new housing port system that allows you to change to a more compact macro port with 67mm screw threads, or a small dome port to better utilize it's built-in fast f1.7 24mm lens.

Nauticam CMC-1Nauticam  Compact Macro Converter CMC-1 is an extremely powerful super macro accessory lens for underwater photography. It is optimized for use with both compact fixed lens and mirrorless interchangeable lens cameras. The CMC  provides more magnification than any compact camera tested can achieve on its own, and does so with improved working distance. This combination makes CMC ideal for tiny, skittish subjects.


New Lights from iTorch, Big Blue & Keldan!

iTorch FishLiteThere are many new lights now available on the market, each with more power and features in a smaller size! Here are a few of our favorites!


i-Torch V25  Combining the best of the Pro6+ and popular v24 lights, the new FishLite v25 sports 2800 lumens, 110 degree beam, 4 white light modes and 2 red, 2 rechargeable batteries. All in a small size and at a great $350 price.

Big Big Blue Black Molly LightBlue "Black Molly"  With 1800 lumens and a wide 120 degree beam the new Big Blue AL1800 is a great focus light at only $249. It's small form factor works well on compact cameras.

Keldan Video 8X
Keldan Video 4X & 8X Video lights The new Keldan Video 8X - CRI 82 10,000 Lumen video light is high powered and also travel friendly. It's especially impressive when that much lighting power comes in a rugged yet precise Swiss-made package that is ready to dive as deep as 200 meters.


Join Us on the Red Sea Aggressor Liveaboard February 28th, 2016 - Only $1695!

OOS Red Sea Photo ExpeditionJoin Optical Ocean Sales for a 7 night Photo Expedition in one of the most popular dive destinations in the world. There are over one thousand species of fish in the Red Sea, 20 percent of which can be found nowhere else in the world.
This is also one of the sunniest places on the planet; corals and their tiny guests thrive in these beautiful waters of the Red Sea. Our itinerary includes the Southern St. John's Reef and Fury Shoal, some of the best diving in the red Sea, sparkling and untouched.
The new Red Sea Aggressor operates from Port Ghalib. This 120 ft., 20 passenger luxury vessel includes modern, en-suite, a/c twin or queen bed staterooms, and a modern layout and furnishings, with legendary Aggressor fleet service! We will also be adding an optional pre-trip land tour.

For more information call 800-359-1295.
See the website, or download our flyer.
 
Sign-up soon, the boat is half full!

Friday, January 30, 2015

Olympus E-PL7 Underwater Photos

Just a few underwater photos taken with the new Olympus E-PL7 camera, EP-PT12 underwater housing and new Olympus UFL-3 strobe. Shot in TTL with the standard mz14-42mm pz lens along with a ReefNet 67mm +5 wet diopter (except the first photo, which was taken with just the lens alone). This gives you a good idea of the quality and capabilities of this camera.

If you have any questions, email Adam here at the shop who took these.

Lion's Mane Jellyfish

Pipefish (+5 Diopter)

Spider Crab (+5 Diopter)

Grunt Sculpin (+5 Diopter)

Tuesday, December 23, 2014

New Free Handbook: How to Photograph People Underwater

We've posted a new Handbook form our Basics of Underwater Photography series: "Photographing People" to the Resource Center. 

Full of tips and techniques from staff writer Margo Cavis on working with divers and models, it will help you add a human element to your photography.

The handbooks are visual guides full of example photos, and are a fast way to get an understanding of the basic techniques involved.

We've also published an accompanying article; How to Photograph People Underwater in our Articles section that gives more in-depth coverage.

You can download it, and the rest of our FREE Basics of Better Underwater Photography Handbooks from the Optical Ocean Sales' Resource Center.

Friday, December 12, 2014

Review: Sony A6000 Underwater Imaging, Part 2

Part 2, Diving in PNG and Using the Metabones Adapter

By Bill Van Antwerp - See part one here.

In the second part of the review for the A6000, I will discuss how the system worked underwater during a 2-week trip to Papua New Guinea on the Chertan and explore some options for lenses other than the Zeiss 50 mm macro lens.

First we will take a look at the Metabones adapter with the Canon 60 mm macro lens and the Tamron 60 mm macro lenses.  Metabones is a relatively small company based in Canada that makes sophisticated adapters so you can use Sony cameras with Canon EF and EF-S lenses. The adapters maintain electrical contact with the camera and can control both aperture and shutter speed information.  The adapters also allow autofocus but with either the Canon or Tamron 60, the autofocus speed is terribly slow. The Metabones site says “Autofocus speed is very slow and inadequate for most moving subjects. The autofocus speed is unfit for professional use for sure, and it would disappoint most enthusiasts.”  I can say with certainty that they correctly identify the issue.  To use the adapter, I put the camera in manual focus mode, set the focus for about 4 inches away and move the camera in and out slowly to reach focus then fire the trigger. 

Before the trip, I compared the Zeiss to the Canon 60 and the Tamron 60 both using the Metabones adapter. Here are some shots to compare the lenses.

Zeiss 50 macro, 1/160 second, f:22
Canon 60 macro, Metabones adapter,
f:22 1/160 second
Tamron 60, Metabones adapter,
1/160 second f:22
Looking at the three photos all appear adequately sharp, in spite of my diminishing ability to detect focus, but using the Zeiss is the simplest since it shoots autofocus.  Notice that all three lenses were shot at f:22 and show reasonable depth of field but due to the magnification that I was interested in the gills of this plastic nudibranch are still a bit out of focus.

Underwater, I was incredibly impressed with the quality of the images produced by the system.  Once the camera/housing/strobes were set up correctly the system is a joy to use underwater. 

On one of our first stops on the Chertan, we came across an anemone with Clark’s anemone fish in it.  Near the side of the anemone was a patch of eggs and with some patience I was able to capture one of the adults aerating the eggs as shown below.

This was shot with the Zeiss 50, 1/100 sec, f:11 from about 2 feet away. Color and clarity look quite nice. 

On the same dive site, we came across this little white nudi, about 12 mm or so in length. This one was shot with the Tamron 60 and the Metabones adapter.  I have probably 20 shots of this guy and this one is the one that is most in focus, using the adapter underwater with the manual focusing technique is quite hit and miss but the quality of the image when you get it is quite nice.


On many of the dives from the Chertan we were specifically looking for nudibranchs.  I often take a homemade stage with me in order to pose the nudibranchs.  This photo is one of a flabellina posing on the yellow green stage.


Doto nudibranchs are some of the most beautiful in the area and can make some spectacular photos. This photo is not terribly spectacular but shows the beauty of the Doto. This one is called the donut but has no family name only sp.

The Zeiss lens captures both the intricate detail of the Doto and the gorgeous colors.

Overall, I like the system a lot. In spite of a few issues with sync speed and manual strobe control, the system performed well and I was able to get a pretty nice portfolio from the trip.  The system using the Zeiss lens is easy to use, all of the controls are very easy to get to (except the back focus button) and it is easy to compose with the viewfinder, I never used the back screen for composition.  Battery life is exceptional; it was easy to get at least 3 dives per full battery charge, and the battery life indication is easy to see and appears to be quite accurate.  At the end of a particularly long third dive the camera told me “battery exhausted” and I thought so was the diver. 

Shooting the system with the Metabones adapter and manual focus is a very different type of photography than shooting it with autofocus lenses.  It is much more contemplative since it takes quite a while to set up and shoot, moving the camera very carefully toward the subject and figuring out focus plane.

The whole process of shooting with the Metabones system is similar to shooting large format cameras, you definitely need to slow down and really think about how this will look on the wall.

The above picture was taken with the Tamron 60 macro lens and the Metabones adapter. Controlling where the in-focus areas should be is great fun but a bit more work than simply aiming and shooting. More work, but definitely a lot of fun if you are willing to take the time on a particular subject.  One other thing that is very easy to do is to use and adapter and some older manual focus macro lenses.  I shot on a couple of dives with an ancient Asahi Macro-Takumar using a NEX – M42 adapter.  You have to pick your aperture and focus length on the boat, this is even more fun/challenging than using the Metabones which allows aperture control, but you can achieve a “look” that is completely different than the “look” of modern lenses.

This little Okenia is about 4 mm long, and this was shot with the Nauticam SMC and the Zeiss 50.  The system is quite versatile since you can shoot semi-manual with your Canon lenses if you want, or you can shoot full manual with any of a variety of older lenses.  While I did not shoot any wide-angle photos on the trip, friends who shoot the Zeiss 12 mm think it is awesome.

Overall, I think the A6000 camera in the Nauticam system is a great tool for shooting macro and super macro.  Using the Nauticam SMC and the SMC multiplier on the Zeiss 50 led to some amazing super macro photos and the quality of the SMC with the Zeiss is remarkably clear with little or no aberrations.

Saturday, November 22, 2014

Review: Sony A6000 & Nauticam NA-6000, Part 1

Diving with the Sony Alpha-6000, Part 1 – Camera and Housing
What’s a Macro Guy to Do?

By Bill Van Antwerp, President, LA Underwater Photo Society
Introduction: We just completed a 2-week trip to PNG followed by a week in Bali. Before the trip, I changed systems (again) and brought only the Sony alpha-6000 camera, the Zeiss 50 macro lens and a brand new Nauticam Housing for the camera. For strobes I brought along a couple of Inon S2000s and a couple of Sea & Sea YS-D1.

The Camera: Before we get to the diving and underwater use, lets take a look at the camera. The Alpha 6000 is quite small; here is a comparison of the A-6000 to the Olympus OM-D E-M1.  The sensor size of the Sony is much larger, it is 23.5 x 15.6 mm while the Olympus is 17.3 x 13 mm; the Sony is 24 megapixels while the Olympus is 16.
Sony Alpha 6000 vs. Olympus OM-D E-M1
Sony Alpha 6000 vs. Olympus OM-D E-M1 (top)
Since lenses need to be designed to cover a specific sensor size, the macro lenses for APS-C sensors are typically larger than those for micro 4/3 sensors.
Zeiss 50 mm macro lens vs. Olympus 60 mm macro lens
Since most of our underwater photographs are taken using strobes, it is important to understand the flash system of the camera. The A-6000 has a tiny built in strobe and it can fire only in fill flash (TTL) mode with no manual mode possible.

How well does TTL work on the camera?

Not terribly well in my opinion. These were shot with the following parameters:
Camera in manual mode, shutter speed at 1/160 second, the max sync speed, internal flash set to fill mode, center point focus and center point metering, and the camera lens approximately 1 foot from the subject. The flash is rated with a guide number of 20 feet so at a 1 foot distance f/20 should be perfectly exposed and here you can see that even f/14 is underexposed. The exposures at f/5.6 to f/11 are fine but at higher and lower exposures the camera struggles. 

This brings me to some of the things I really like about the camera and things that I think are major limitations.

Upsides:
  1. The camera is quite small, very easy to use and the menu system is much simpler than say the Olympus cameras. 
  2. The large sensor can lead to beautiful photographs when coupled with the right lenses.  Native ISO of 100 is also great, really gorgeous and very low noise shots. 
  3. The Zeiss lens is quite sharp, with beautiful bokeh and great color rendition. 
Downsides:
  1. There is no manual flash mode, only fill/TTL. This often leads (after 5 shots or so) to ridiculously long cycle time for the internal flash to fire. It also significantly eats into battery life.
  2. The camera has a maximum flash sync speed of only 1/160 second. This is far too slow for serious wide-angle shots, particularly sunballs and makes it hard to reduce ambient light and get black backgrounds.
  3. The Zeiss lens while quite nice and quite sharp is rather slow to focus and hunts a lot, and the camera will fire the shutter with nothing apparently in focus. This leads to quite a few missed shots and quite a few throw away shots with nothing in the frame in focus.
Nauticam A6000
The HousingThe Nauticam housing for the Sony A-6000 is very much like any of the micro 4/3 housings from Nauticam.  The housing is black anodized aluminum that fits the camera like a glove and the camera mounts inside the housing with a mounting plate that securely locks in place. Unlike the NA-EM1 Nauticam housing with integral handles, the A6000 housing uses on of the Nauticam tray systems with no handle stabilization. I used a Flexitray with two handles with the system. Since I set up my system to have quite a bit of flotation, I have set it up as shown below.

My System
The system is shown here the way that I dove it most frequently with 2 Inon strobes on very short arms and a focus light attached to the body. Occasionally I shot it with two Sea & Sea YS-D1 strobes, which are a bit larger and quite a bit more powerful. I always used the housing with the vacuum system installed; it is something that everyone should use for every housing. The vacuum system from Nauticam is quite nice, easy to use, and once the vacuum is pumped down it held for at least 24 hours, so I could set the camera up the night before an early dive. The port system for the housing is great, with positive locking assured if you can close the port latch.

A New Contender:
Sea & Sea Enters the Mirrorless Market

Sea & Sea has been busily redesigning and re-inventing their product MDX offerings to be more competitive. The first of these was the MDX-RX100 compact housing that was released last spring. Now they've released the first of their new mirrorless line, the MDX-A6000.
Sea & Sea has done their homework and the housing is easy to hold and use, with larger dials and labeled controls. It should be a little easier to use than the Nauticam version in some ways. Sea & Sea has used the same sort of locking lever and internal bayonet mount that Nauticam pioneered (rumor has it that it was licensed from them).
The housing is more angular with unusual mounting options directly on the housing for base-to-ball mounts, which may/may not be useful - a tray is the best idea to spread your arms and strobes. But the angular shape allows for the video button and the zoom control to be spread out so that your hand doesn't accidentally hit it while going for the the AF button or rear dial - one of Bill's chief complaints above. This results in a housing that should be much easier to use with gloves.
Other differences include the Vacuum leak detection system on the Nauticam. Sea & Sea has a leak detector as an option (and it's not cheap).
Initially Sea & Sea only has two ports as well, Nauticam has a complete selection for all the Sony lenses, but in the coming months more port and gear options will be forthcoming.
Consumers are the winner here, more selection and competition should spur better design and pricing.
How well does the housing work? The Nauticam housing works quite well with a few minor and a couple of major issues.  The camera goes in the housing with a satisfying feel, a nice click and it is seated firmly.  The two major issues I have with the housing are the placement of the AEL button, which is inboard of the record button. I am a big believer in using AEL for composition but with this housing it is a pain since I kept turning on the recording and this was in tropical waters with no gloves. At home in California in dry-gloves this will be virtually impossible.

The second complaint is that threaded port for the ball mount on the top of the housing is not keyed as it is on some other Nauticam housing which means that the focus light spins more or less freely even when the ball mount is tightened as much as possible by hand. Having to use a tool to tighten and remove a ball mount is not an elegant solution, keying the threaded hole works quite well.

I have a few minor complaints about the housing. The first is aimed at some of the materials used in construction of the system. Like with many other Nauticam products, rusting of stainless steel components is a problem. On my Flexitray, the screws holding the handles to the base are severely rusted. One other minor issue is that the handles on the system are quite flexible; unlike the more “professional” Nauticam micro 4/3 housings that have integrated handle braces, this one is quite bendy.  Finally, while there is a button to raise the camera flash after loading in the housing, about half the time it doesn’t work properly with the flash sticking on the plastic plate of the flash ports. I learned this the hard way on several dives where I had one working strobe on the left side of the housing and with no right side strobe. I changed cords, and did a lot of diagnostics underwater instead of taking pictures but eventually figured it out. If you use the system make sure that you put the camera in the housing, then raise the flash and make sure it is seated properly before closing the back.
The system as configured using dual strobes in TTL mode show almost the exact same pattern of exposure as the native system with both Inon and Sea & Sea strobes, with underexposure at the small apertures that one typically uses for macro photography. After a few dives with TTL, I switched the strobes to manual and ignoring the pre-flash was able to get quite nice exposures on most subjects.  I will take a look at the underwater performance in the second part of this review.

Conclusions on the system – Overall I think the system works quite well with a few limitations. The camera is very nice, very ergonomic and the lens is capable of stunning photographs. The housing is small, very ergonomic (with the exception of the AEL button) and I had no issues with performance of the system.  The major quibbles I have are with some of the choices that Sony has made with the camera; no manual flash mode, and a sync speed of only 1/160 second. The Zeiss lens creates beautiful images, but even with a 1200-lumen focus light was a bit slow to focus. Once focus was achieved though, the pictures I think were amazing. This is a great system for shooting macro subjects and when coupled with the Nauticam SMC, super-macro with the system can be fantastic.  Getting black backgrounds at 1/160th shutter speed can be challenging but I would recommend this for the macro heads out there.

Continued on the second part of the article.

Thursday, November 6, 2014

Tips for Underwater Photographers Thinking About Shooting Video

By Margo Cavis, Optical Ocean Sales
Have you ever been on a dive where you see some big animals – but you just can’t get close enough to capture a really good photo? This is the perfect chance to try out video. Some scenes that don’t make good still photos can actually make great video – like a group of dolphins off in the distance. Or, would you like to show behaviors, or tell a story? Do you want to show your non-diving friends and family how cool it really is? How about showing the world your story – online?
Video options have come a long way! Chances are, you might already have a camera that is capable of shooting video – so where does your camera fit in? Or maybe it’s time to upgrade and you’d like a camera that can shoot both photos and video?

Here are some basic camera formats and new popular models:
Basic, super compact cameras – GoPro Hero 3+ and 4 and Sony ActionCam
Compact cameras – Sony RX100 III, Canon G16 & Olympus TG-3
Mirrorless cameras – Olympus E-M1, Sony A7S or A6000, Panasonic LUMIX GH4
DSLR cameras (Crop frame) – Canon T5i & Nikon D7100 – ALSO – (Full frame – Mid-Range) – Canon 70D & Nikon D750, (Full frame Professional) - Canon 5D Mark III or 7D Mark II, Nikon D810
Consumer Camcorders (Handy Cam) – Canon Vixia HF G30 & Sony FDR AX100 with 4K video
Professional Digital Video – RED Epic Series, Sony CineAlta, Canon EOS C500- The sky is the limit!

So, if you have already been doing underwater photography, and want to venture into underwater video, or maybe you are diving straight into video… either way, here are some things to consider.


Practical Tips – the differences between Underwater Photography & Underwater Videography
Video Tunnel Vision
One of the biggest differences between taking still photos and video is the awareness that you have to have while shooting. While shooting video you have what I call tunnel vision. You have to keep your eyes focused on your view screen for much longer periods of time – while also being aware of your environment – using your peripheral vision. This is especially important when shooting video as you are moving or swimming.

Best Buddy
When shooting video I find it much easier to focus on what I am doing – if I have a dive buddy that I can rely on to keep an eye out for where I am – instead of the other way around. Because, with video, longer periods of time are focused on your camera – it makes it a little more difficult to keep an eye on your buddy. If you have a buddy that does not carry a camera – that’s even better.

Memory Hog
Video takes up much more memory than still photos! Make sure to use at least a 16G or bigger card – and – empty the card or change cards at the end of every dive day. Also carry back-up memory as well as a back-up battery.
Lighting – the same, but different
When taking video – you will need constant light from underwater video lights, as opposed to strobes. Although you will be using completely different lights, the ideal positioning is about the same for both.

Getting even better color
If you will only be editing your video with simple software programs like iMovie or Windows Movie Maker – you will not have the ability to edit your video’s color to the degree that you might be able to edit photos. So – use manual white balance if possible. More & more cameras have that option now. If you have Final Cut Pro, Premiere, After Effects or another professional editing software – you will have options for editing color, but – it’s always ideal to start with the best footage possible!

Don’t bore your audience – keep them wanting more
I know diving is exciting, but when people are watching footage later, it’s not exciting to watch the same thing on a screen for endless minutes. Yes, minutes can be way too long! Unless you are making a documentary or trip video for a group – videos should be 2-7 minutes long – with most falling in the 2 - 3 minute range, especially if you are posting them online. Keep each clip within that video around 3-10 seconds – unless there is something super exciting or captivating. Add some music to help keep things moving (but please follow copyright law).

Composition is now a moving story
So, you got the idea of how to take a good photo – now you need to look beyond that one shot – expand your intuition and predict movement. Think about how your subject is moving, then position yourself to capture it at an interesting angle. Also think about moving yourself while shooting. This will be different, try to keep camera motion as smooth as possible and again, be aware of your environment.

It’s not always best to follow your subject
Just like video on land, sometimes it’s better to let your subject enter or leave the frame – that can make a nice transition to another shot. And, you probably already know from photography – no one wants to see fish butt, that is true in video as well.

Don’t wait too long to shoot
It’s always better to have extra footage rather than too little. You want to have the before and the after – if you wait too long and just get the middle – it can make the flow of your video awkward. The same is true at the end of your take, continue filming so you have room for a transition, plus you never know what’s going to happen underwater!

Keep it crisp & clear
Before you take your camera underwater – make sure your video settings are set to PROGRESSIVE – even if you have to choose a smaller image size – choose the largest progressive setting. Interlaced settings will give you nothing but headaches when shooting underwater. Think about a group of vertical striped fish swimming by – if you shoot interlaced video – your camera only record every other horizontal line – can you picture how that might be a problem?

How many frames?
Because of the movement – the more the better! You don’t have to think about the old standards – of 24 or 30 – at least not while you are shooting. If your camera can shoot 60 frames per second or 120 (making sure it is still progressive) – go for it! More frames means more information which means clearer motion.

Before you take your camera out - set the movie file settings & keep it “Progressive.” This applies to all camera groups.

Sunday, November 2, 2014

Valencia Aquarium; Europe's Largest and Best!

I'm off driving around Spain for a couple of weeks on a non-diving vacation. You remember them...

Went to the excellent Valencia Oceanografic aquarium today and it is incredible. All of the oceans of the world represented in stellar fashion, huge tanks with multiple tunnels under them, on and on. Incredible architecture, simply world-class. All shots with an OM-D EM-1 and 9-18 and 12-50mm lenses. 
See photos


Translate