Friday, March 18, 2016

Egypt & The Red Sea Aggressor Photo Expedition

The last time I saw the Egyptian Pyramids was 18 years ago. A lot has changed, and a lot hasn’t, having already all ready lasted 5,000 years. One of the things that was new is the lack of tourists, mostly due to misplaced fear. Fear of different cultures, and fear of the unknown. Some is founded on media hype, and some is due to mistrust, but most of it is misplaced.

Divers, however, are a strange breed. When somebody yells “shark”, most people run away, but divers say “Where?” and jump in the water. Underwater photographers are even worse. They’re experienced divers who want to take shots of the most unusual animals and situations. They may be apprehensive and careful - that’s a good thing - but never so scared that they miss a great opportunity.

Our Optical Ocean Sales Photo Expedition was for two weeks; Feb. 22 to March 7th, 2016. Twenty people had signed up, but as usual we had a few drop out due to work conflicts or health reasons, and a few join in. Several dropped out, however, because they were afraid of the political situation or for their safety. And I’ve had several inquiries since we’ve been back  asking if we had problems or if the Egyptian people were hostile to us. We all found that the answer was quite the opposite. We had a great time. We felt quite safe. People were extremely warm and friendly, just as they were on my last trip to Egypt, 18 years ago. Some things in Egypt, like the Pyramids, don’t change. It’s all a matter of perspective.

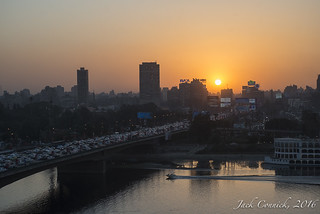
We started out our land tour in crazy, raucous Cairo (“why use your turn signal, when you can use your horn?”). This is a terribly over crowded city, with heavy, 24/7 traffic. Cairo is the very definition of urban sprawl with 24 million people. It now surrounds the Giza plateau, which was once well out into the desert.

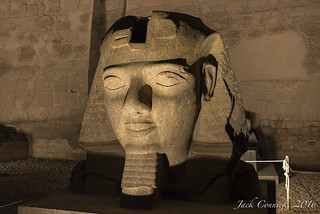
We toured the Egyptian Museum, Pyramids, Solar Boat and Sphinx at Giza and had a great dinner at a Thai food restaurant. Seriously, one of the best Thai dinners we have ever had was at “The Birdcage” in the Cairo Intercontinental Hotel.

Our group then flew down to Luxor, where we stayed at the Jolie Ville Hotel. It was busy and disorganized, having been mostly vacant for a while. They had an oncology conference in progress, where about half of the doctors were smoking like fiends. Public smoking is still pretty much the norm in Egypt; I guess Joe Camel lives on.

One of the highlights of our trip was the next morning when we went hot air ballooning. Taking off just before dawn, with the heat of the burners warming us, we watched a spectacular sunrise from 2,000 feet over the Nile. We looked down on farms, and the tombs of the West Bank, where we would spend the rest of the day touring. Visiting 5,000 year old tombs, with vibrant paintings as fresh as yesterday, the ancient temples of Karnak, Luxor and Medinet Habu, gave one a sense of perspective.

Many times young Egyptian school kids, practicing their English, asked politely to have their pictures taken with an American. We couldn’t have felt more welcome in their country.

But on to the diving: We left the next day on a long 5 hour bus ride to Port Ghalib, near Marsa Alam, where we met the Red Sea Aggressor liveaboard. We came across large hotels, condos and resorts without anyone in them as we drove along the coast. They were like ghost towns. All very sad, as this was high-season. Reaching the boat at dusk, we were welcomed aboard and shown our cabins on this luxurious ship.

The Red Sea Aggressor was rebuilt a couple of years ago and is very comfortable. Although our cabins were pretty small, the dive deck and various sun decks and the salon were very nice and newly appointed. The camera tables were a bit small for our large group, but we managed, with a couple of us using the cocktail tables up near the bar on an upper deck. Throughout the week we were treated to amazing service (better than the other Aggressors I’ve been on) with excellent food, served in a fine dining atmosphere. I’ve been on a lot of liveaboards, and I could see how well the crew had been trained; not just to do their jobs, but to take care of guests anyway they could.

The next morning the boat headed out of port to a couple of close dive sites to test our weighting and settle into our skills. The water was a bit brisk at 74F, but with 5mm suits and beanies on, we were pretty comfortable. The weather this time of year is pleasant, in the upper 70’s and low 80’s. Some days we had some wind, but it wasn’t too bad.

We then steamed most of the night to Daedulus Reef. It was a bit of a bumpy ride, so most of us didn’t get much sleep. However, we were up at dawn and woke up in the cool depths after a zodiac ride out to the reef.

Daedulus is a coral atoll out in the middle of the Red Sea with an old lighthouse on it, first built in 1863 and rebuilt in 1931. We were hoping to see some hammerhead sharks and other pelagics there, but were skunked, only seeing one silky shark (I am told it swimming under my feet while I surfaced on the last dive). But the walls were nice, and there were lots of great hard and soft corals of every hue, in very clear water. That afternoon, we took a break to hike up the dock to the lighthouse, where we climbed our way to the top. A few of us almost lingered too long; the keeper had us locked in!

Steaming our way further south that night, we arrived at the St John’s reef area, where we had some spectacular dives in the caves and swim-throughs located there. We then moved a little north to a great spot that had some pinnacles covered with soft coral and clouds of orange Anthias. Although the current was ripping, it meant the corals were open and the photography opportunities abundant. Also on many dives we were seeing jellyfish, and had a great time on the surface shooting them and each other. Some divers practiced their blackwater dives and got some great night shots of squid and other small squishy critters.

The next couple of days we hit a few atolls and reefs along the southern coast, then moved up to “dolphin reef” lagoon, hoping to snorkel with some dolphins. They weren’t home, so we did a couple of easy dives enjoying the scenery. After surfacing, we found that another boat had anchored next to us. Much to our dismay, a group of snorkelers were standing on the reefs, not really understanding the damage they were causing.

The last day we hit famous Elphinstone Reef for a couple of morning dives on walls and a drift dive along the reef. Schools of trevallies and sardines were amongst the soft coral, with some nice gorgonian fans, not usually seen in abundance. We then steamed back to Port Ghalib for a fun cocktail party and then off to Cairo and home the next day.


Although this was a long trip, all who came seemed to enjoy it and have many happy memories of the ancient cities and colorful reefs of Egypt and the Red Sea. My thanks to Donna at South Pacific Island Travel and the Red Sea Aggressor for providing us with an excellent experience. Cairo & Giza, Egypt Luxor
Red Sea Aggressor

Thursday, February 18, 2016

Guide: Setting Up the TG-4 Camera & YS-03 Strobe Package

Our popular Olympus TG 4 Camera, Underwater Housing and Sea & Sea YS-03 Lighting Package provides you with everything you need to shoot great underwater photos, including the TG-4 camera! This lightweight package is great for travel and contains everything you need to get your shot. It's great for those starting out in underwater photography, or those wanting a small, extremely rugged and easy-to-use setup that can take amazing photos. The TG-4 has built in underwater modes that are easily accessed.


We've written this simple article to help get you started with this camera and Sea & Sea strobes.
We also have a review with photos that will show you some practical ideas for using it. Be sure to also visit our Handbooks in the Resource Center as there are many free guides there to help you get started with underwater photography, and understand techniques to improve your photos.

Monday, February 1, 2016

Correcting Lens Distortion in Underwater Photos


Barrel distortion makes this soft corral look bunched up and the piling curved on the original to the left.
On the right image, lens corrections were applied and a new file created in Photoshop.
Ultra-wide fisheye lenses are the preferred wide angle lens underwater due to their close focusing ability, sharp corners and wide field of view. Divers can get very close to their subjects, filling the frame, eliminating water which makes their photos lack sharpness, color and definition.

But there is a drawback to fisheye lenses when shooting the straight lines, commonly of a pier or wreck, or models or other similar subjects - optical distortion is introduced. This is usually barrel distortion, but it can manifest itself as pincushion distortion, or a mix of both. It is usually worse the closer you are to the subject. Tilting your camera up and down can help a bit and is something to be aware of as you shoot.

Barrel distortion is most common on wide lenses.
What are Common Lens Distortions?
In barrel distortion, image magnification decreases with distance from the optical axis. The apparent effect is that of an image which has been mapped around a sphere (or barrel). Fisheye lenses, which take hemispherical views, utilize this type of distortion as a way to map an infinitely wide object plane into a finite image area. This curves those lines and the closer you get, or when shot at more of an angle, can lead to a distorted view.*

There is also pincushion distortion with the center looking pinched. You’ll see this slightly in longer macro lenses and telephotos.

Droopy barrel on left, corrected on right.
Sometimes that looks very dramatic and lends diagonal lines to the image, but particularly on man-made objects, or diver-models the proportions it lends looks wrong.

Generally, with most lenses from major manufacturers (except for m4/3rds lenses), you can adjust this in Lightroom under the Develop tab using the “Lens Correction” tool menu. Basic, Profile, Color & Manual that are used to lessen lens effect distortion and correct lens color aberrations.


There are 4 tabs within it:
  • Basic: This is sort of an Overview with some auto settings.
  • Profile: Just check the box to switch the corrections or aberration removal on. Many lenses are listed from camera and lens manufacturers. Choose your manufacturer and lens (or something close to it) and the profile correction is enabled correctly. There are adjustments here for lens correction.
  • Color: Color aberration is commonly seen on macro shots where you’ll have a purple or green 1-2 pixel fringe around contrasty areas. You can enable the correction and adjust it here.
  • Manual: This allows for manual correction of many aspects of the photos. Some experimentation will show you what the adjustments do. remember you have full control of the history of all adjustments in Lightroom should you want to start over.
All this is easy to do in Lightroom. But what if you’re using an Olympus or Panasonic camera with m4/3rds lenses? They don’t show up in lens profile and their profiles "can't be found". The reason is that micro 4/3rds lenses have the profile correction build into their RAW files. Which is cool, but my experience is that auto correction is not usually enough, images still look distorted. like the gun barrel above.
Lens Corrections filter in Photoshop works on all files.

Edit in Photoshop
This is where “Edit in Photoshop” can help. It also can also be used to give more control with other lenses as well. Simply select the photo and go to “Photo” menu: Select “Edit in…” and choose “Photoshop”.  This will open a copy of the photo in full high resolution for you to edit further in Photoshop.

In Photoshop choose the “Filters” and select “Camera Correction” filter.

This opens up a large filter effects window that gives you some of the same adjustments and a lot more so that you can fine tune your photo in Photoshop. This allows m4/3rds lens users to straighten this straight lines and reduce distortion in their photos as well as make many other adjustments to improve their images.

The Camera Correction filter is pretty powerful, and you can remove and adjust many different aspects of shots, including vignette, color aberration, lens distortion and horizontal or vertical perspective, crop and more. Just go to the "Custom" tab within the filter. It's all pretty straight-forward and easy to see the results as you go. The best way to figure it out is just to play with it.

There's lots of control for correcting images, even with m4/3rds lenses.
When you like what you are seeing, just hit ok to process the effect, and your edited photo is displayed in Photoshop. You can choose “undo” and “redo” to toggle the effects if you like. If you like what you’ve edited, just “Save” it and the photo is saved and added to your Lightroom Library as a high-resolution tiff file and numbered "1 of 2", etc.

Remember Photoshop is only working on a copy - it will not effect your original. These adjustments will also effect the crop and you can try some of the other controls to adjust that problem as well. It’s all sort of a balancing act for your creative eye to judge. Don’t be afraid to try a few ideas out then you can “A-B” them in Lightroom to pick your final image.

I’ve done a few examples. One the wreck image, the deck cannon barrel was distorted where it went through the center of the frame by the Olympus 8mm FE PRO lens I was using. I removed some of the barrel distortion to straighten it.

The same was true with the yellow soft coral image above. The center was sort of “poofed out” with barrel distortion and the piling it was on had a curve to it. By adjusting the controls, I was able to lengthen the clump of soft coral and flatten it a bit, and also slightly straighten the piling, making it a more natural image.

Original on left, "corrected" image on right. This was done directly in Lightroom as my Sigma lens was supported.

The pilings were easily straightened on the above shot. I also altered the vertical and horizontal perspective to bring the soft coral more front and center and not loose the school of fish. It took some give and take not to crop too much of the image.

You don’t want to overdo the corrections, and you’ll usually not want to remove the distortion all together, as then you won’t have a very wide angle shot and it will lack some punch. Just try for a more natural look.

But don’t be afraid to straighten out those wrecks, pilings and people for a more natural presentation.
— Jack Connick

*(Source: Wikipedia)

Thursday, January 21, 2016

Olympus EPL-7 with Nauticam WWL-1 & CMC Lens Review

The Nauticam WWL-1 Wet Wide Lens features a sharp 130° FOV.
Nauticam’s new WWL-1 (Wet Wide Angle lens) and their CMC-1 (Compact Macro Converter) have showed how far the quality of wet lenses has come. They are specifically designed for mirrorless and compact cameras are much sharper, and have very little, if any, distortion or aberrations that were common in previous wet lenses. Nauticam has shown good results with these lenses on their own housings with higher-end Sony, Panasonic and Olympus cameras. But when I first saw the WWL-1 lens at DEMA, I was intrigued to see if it would work with a less expensive Olympus PEN E-PL7 camera and carbonate PT-EP12 housing that came out a year or so ago. Would the WWL/CMC system be versatile enough to work on a 3rd party housing?

The Olympus E-PL7 is a camera and small housing that we liked at first look, but was hampered by Olympus’s insistence that the small port that comes on it can’t be changed. It like all Olympus PEN housings can easily be changed - there’s a small set screw and the port just twists out on a bayonet. Zen and other third party ports for wide angle can then be used.

The Olympus PT-EP12 housing only supports the 14-42mm EZ electronic zoom “pancake” lens. Which is the lens that’s compatible with the Nauticam WWL-1 lens.

The Olympus 14-42mm EZ
also is a nice fish portrait lens.
But would the WWL and CMC fit and how good would the quality be? I talked briefly with Edward Lai, Nauticam owner and he said it should work - if the port fits close enough. That’s necessary to get the proper fit between the optics. Testing it in the store, it looked fine, even while using the Nauticam locking bayonet mounting system on the Olympus 67mm threaded port. Fitting the bayonet to the Olympus port worked fine, you only have to remove two set screws from the mount. While this could cause it to rotate on the port, we found that by tightening it well friction held it in place just fine. I took both lenses on and off underwater without a problem.

I outfitted the PEN 7 system with a couple of Sea & Sea YS-D1 strobes along with two sets of 10Bar arm floats. The WWL is a heavy glass high quality lens. Out of water, it weighs about 3.8 pounds. In water, I’d guess less than 3 pounds. So some floats are necessary to make it more neutral. The four 10Bar arm floats worked out well, balancing it nicely.

On a recent short trip to Hawaii’s Big Island at Kona, I was able to take the rig on a couple of dives. I was hoping to find some big animals to try out it’s 130° field of view, but never saw them below water. But I had some fun on the reefs, tried a few general shots, and “herded” around a school of goatfish.

The Nauticam CMC Macro Converter lens is free of aberrations.
The E-PL7 camera shot well, certainly rivaling it’s “big brother” the OM-D EM-5II in image quality. And actually it’s the same camera in many ways, without the viewfinder, direct controls, or weather-sealing. The “innards” including the sensor, processor and so forth are the same. But as a DSLR shooter, I was a little frustrated at it’s slower AF and overall I found it slower to use. I much preferred the Olympus OM-D E-M1.

But it depends on your perspective, I think someone upgrading from a compact camera would be quite pleased with it's sharpness and versatility.

Olympus never did make a zoom gear for the 14-42mm EZ lens, you have to do a quick button assignment to toggle the camera to zoom electronically using the left-right buttons on the back of the housing. This would work very nicely with full “zoom-through” focus from 14 to 42mm using the WWL lens.

The CMC also has a bayonet adapter which is very handy for it and the SMC; I’d say a “must-have” instead of trying to screw these lenses on and off. A flip holder from Nauticam or Saga is probably easier, but they are a bit expensive for some budgets and you can’t put a wide angle lens on them. The Nauticam bayonet is not compatible with other diopter lenses such as those from ReefNet and others that have a flat bottom.

On the same dive I tried switching it out the WWL wide lens with the CMC diopter for some macro shots. This means you need to park the 3 pound WWL lens on a Nauticam bayonet lens holder on an arm, which is not really the most balanced idea. It does work, but is quite awkward. I actually just laid it on a rock for a bit while shooting the macro CMC lens.

Unlike fixed macro lenses, you can zoom in and out
with the 14-42mm EZ and CMC combination.
The CMC lens shot fine and could be used from about 16mm to 42mm. Below 16mm, it vignettes with the bayonet adapter. Most people want more magnification and are using it for the 42mm end of the lens scale. Shots had little, or no, distortion and were pretty good quality for a “non-macro” lens with diopter. At approximately +15 in comparable magnification I was able to do nudibranch head shots easily.

So was this a setup I would recommend? Maybe, maybe not. Cost wise you are starting out pretty reasonably; $499 for the Olympus PEN E-PL7 and 14-42mm EZ lens, $759 for the housing. But you are adding on a $999 WWL and $320 CMC lens to the equation. But it’s still about $1000 or so less than a comparable E-M1 or E-M5 MKII and 8mm FE lens and Zen Port system. And more convenient - part of the savings is having to pack lenses and ports around.

Macro and wide angle on a mirrorless camera - all on one dive!
But the "kit" Olympus 14-42mm lens has it's limitations; it's never going to be as sharp or as powerful as a high quality, prime lens like the Olympus 8mm FE Pro or 60mm macro lenses.

If you’re thinking about a smaller, mirrorless camera set-up, particularly if you want video with an electronic zoom capability, this would be a good, versatile, value-priced option indeed. — Jack Connick

Wednesday, January 6, 2016

Nauticam Panasonic GH-4 Review


I recently took a dive trip to Bayahibe, Dominican Republic to do underwater video. But, before my trip, I finally had the opportunity to upgrade my underwater photo/video system. 


Working in an underwater photography store for over a year now has given me a lot of time to think about what camera system would work best for me. It has also made me aware of a huge amount of technical information as well as the opinions of many other underwater photographers. Sometimes I think that made it harder for me to decide (as I have changed my mind several times over the past year) because I know of so many options.

I actually got my start on an old MX10 film camera, then upgraded Olympus digital cameras. But, until recently I have been using Canon crop frame DSLRs for about 8 years for photography as well as a Canon HD Camcorder for dedicated video. My latest Canon DSLR (purchased in 2013) was an attempt to combine photography and video in one system. But the Canon t4i / 650D, while great for photography, fell short on underwater video - due to the lack of smooth autofocus while underwater. 


So, after a year of waiting and researching, I finally decided to get the Panasonic GH4 (even though it had already been out for quite some time), since I had started doing more video than photography, but still wanted the option to do both. I also liked the idea of being able to shoot 4K video and the fact that (with an adapter) I could still use all my expensive, high quality Canon lenses while I was not underwater. The GH4 also has a huge number of options for HD video formatting. For this trip, I chose .mov files - 1920x1080p at 60fps since I was shooting wide angle and wanted the higher frame rate for more detail in movement. For more ideas on specific camera settings read the Setting Up the Panasonic GH4 for Diving article.

But I still needed a mirrorless lens for underwater. Since the majority of my underwater video has been wide angle I decided to get the Olympus MZ ED 7-14mm f2.8 PRO lens as my first lens. I was a little concerned about finding mirrorless lenses that would measure up to the Canon lenses I was used to, but this lens sure does! It does a really good job for wide-angle shooting - as well as close focus wide angle - in any condition. (See my review of the Olympus 7-14mm lens here.)
For my housing, I chose the Nauticam NA-GH4 Housing with a 180mm Optical Glass Dome Port and the N85 to N120 55mm Port Adapter with Knob. Since this is all a really big investment, I added the Vacuum system to the housing for extra security. I chose Nauticam for many reasons, including ergonomics and durability. All the buttons are so well thought out, making them second nature to use. I am also very impressed with the port system. The port and adapter is very easy to assemble and lock to place, so that I know without a doubt that they are secure. I hope to add additional lenses and ports in the future, and there are so many to choose from. That is another reason I chose Nauticam - the fact that I can easily “grow” this system. One thing on the top of my wish-list, since my focus is mainly on video, is a SmallHD 502 monitor with a Nauticam NA-502 housing.

On this trip, I also had the pleasure to demo two 4000 lumen i-Torch Venom c92 video lights. To hold the lights, I used i-DAS arms with 2 medium sized 10Bar floats added to the arms. That, combined with the amount of air around the lens in the dome port, made the system close to neutrally buoyant. (Check out my review of the i-Torch Venom c92 Video lights here.)


On my first dive day I decided to just take the camera and housing (no arm system or lights) so that I could get used to the camera underwater in a less bulky manner. This worked well for me to get confident with a new housing and it also made me super excited to the bring the lights the next day - since, even with some manual white balance, my footage was flat and too blue without the benefit of lighting. Plus, I found out I would have the chance to go wreck diving the following day! That is a “must have lights” dive for sure.

When shooting the GH4 underwater, from here on out, I used some manual white balance, plus the 2 iTorch c92 4000 lumen lights. I set the manual white balance ahead of time using a few different shades of blue - for different depths. Since I did not have a dive buddy and I wanted to limit underwater fiddling around with gear, I tried to have as much set up ahead of time as possible. I found this method of manual WB plus lights, worked the best for all situations except when there was no blue light (natural light filtered through the blue water). On my dives, this only happened in the vary dark areas of shipwrecks, but the same would be true for night dives. On those occasions just the lights, with auto white balance is good.

In Bayahibe, most of the diving was not very deep - about 40-60 feet average, but the first wreck dive, the St. George was deeper: Bottom - 144ft, Stern - 102ft and Top - 50ft. We did not go to the bottom, but we swam through many of the upper rooms at around 90-100ft. This depth, combined with the loss of light inside the wreck made nice bright lights essential for good footage


Since the water had high visibility I used the lighting position in the above
illustration, being careful to make sure the lights are behind the front of the dome port. While diving through the wrecks, I did have to keep repositioning the lights in order to be able to fit through doorways and other openings. So, sometimes I could not have the lights in ideal position while inside the wrecks. Because of this, occasionally the edge of the light was visible. I do wish the edge fall-off was more gradual, but other than that, the light from the c92s was perfect. For most dives I kept the light power between 7-9, I only turned the brightness down for very shallow shots.

I was very happy with my new system, it is a huge upgrade from my old Ikelite housings and lights. Everything felt so much more secure as well as just better engineered. The Nauticam handles are very ergonomic and all the buttons and knobs work so smooth and precise. The white balance button on the housing threw me off a little at first, as it’s a little hidden on the side. But once you know it’s there, it’s super handy positioning. I also really liked having the green light from the vacuum system - telling me everything is airtight - before I even jumped in the water! The i-Torch c92 lights offered nice bright and even light. The GH4, combined with the Olympus 7-14mm lens worked very well to give my footage great detail, color and focus. —  Margo Cavis, Optical Ocean Sales


Monday, December 21, 2015

Nauticam Sony a7II with WWL & 90mm Lenses Review

Shortly before heading to the Philippines, customer Tor Trygstad decided to upgrade his Nauticam Sony RX100 compact system to the new, full-frame Sony a7llr MIR in a NA-A7II Nauticam housing. Although he really likes shooting macro, and housing the Zeiss 90mm macro lens was his first lens choice, he was impressed with the new Nauticam WWL-1 “Wet Wide Angle” lens system that works with the Sony 28mm f/2 lens.

“It was less expensive and much smaller than housing the Zeiss 16-35mm lens,” Tor said, “and having that ultra-fast Sony f/2.0 lens, coupled with the low-light capabilities of the Sony a7rll sealed the deal.” However, he did find it a bit heavy in the water and has added some additional floats. “It’s a lot of glass, he added.”

The Sony a7Rll was quite a step up for him from the RX100, although some of the layout of the menus is similar. He felt that the a7IIr has a great control set, and that he could make changes rapidly. “For my skill level this is invaluable for getting the shot right!”, he stated. One of features Tor liked most about moving to the advanced a7IIr SLR was a separate AF lock button - he ended up using it exclusively of the half-press shutter button; although you can lock AF either way. But locking it down and then recomposing by using the “back button” AF lock seemed easier after getting used to it.

Tor also said that with the with the Zeiss 90mm macro lens focus would hunt at times, or locked inconsistently. Using the focus preview helped quite a bit. Focus peaking and the magnified view display features the camera offers in manual focus are a better answer, so a manual focus gear was the first thing he bought upon his return.

One of the problems he had was that Live View Display comes turned on as a default on this camera (and some others like the Olympus E-M1). It shows the effect the aperture or exposure compensation setting has on the display while in manual camera mode. The result is that the display is very dim and hard to see. “A quick email to Jack at OOS, and he sent the instructions to disable that feature”. (Under Menu: Live View Display, turn feature off).

The Nauticam housing really impressed him. “Another flawless Nauticam experience,” Tor stated. “The controls are so well laid-out and the vacuum leak system was easy to work. It really took the worry out of taking my new system underwater.”

He added, “The only issues I had with the controls was that it was a little easy to hit the video record button. However, there is a camera setting to prevent that. I also occasionally nudged the exposure compensation wheel as well. But that’s pretty normal while getting used to new equipment.”

Tor used two Sea & Sea YS-D1 strobes, along with Nauticam’s flash trigger for fiber optic firing of them with manual control. “Manual is all I ever use anyway, it gives me better control than TTL”. You can buy the housing with electrical bulkheads as well. We have found that the new Sea & Sea YS-D2 strobe currently has inconsistent operation with flash triggers, due to a less-sensitive sensor on the strobe. Sea & Sea and Nauticam are aware of the problem, and are working on a solution for the new YS-D2 version of the strobes. Inon and Ikelite strobes don’t have that issue with the flash trigger.

Tor’s bottom line on the Nauticam a7 II system? “I ended up with far more keepers than normal. I continue to be impressed with Nauticam housings and Sony cameras, and this was without a doubt the easiest and most rewarding photo week yet!”

Tuesday, December 8, 2015

Olympus 7-14mm f/2.8 PRO Lens Review

When deciding on a lens for my new Panasonic Lumix GH4 camera body, I chose the Olympus M. Zuiko Digital ED 7-14mm f2.8 PRO lens over a Panasonic lens, and I have been extremely happy with my decision. I just recently started shooting Mirrorless and after years of using only high quality Canon lenses, I was a little concerned about finding mirrorless lenses that would measure up. This lens sure does!

The Olympus M. Zuiko 7-14mm f/2.8 PRO lens is a really good choice lens for wide-angle shooting - as well as close focus wide angle - in any condition.

One of my first happy surprises was the image and color quality while shooting in the low light conditions - just before sunset. The images were so crisp and vibrant at a time when most lenses would just give me flat, muted results. In the example to the left I took a simple picture of my dog, but I really liked the result - there are so many colors on the beach, the reflections on the water and even in the sky… colors that other lenses and even many times the human eye, might miss. This was great news for me since I am an underwater photographer/videographer where lighting and color are always challenging. For example - the shipwreck had very challenging light, but even with the extreme light at the top, the details can still be seen in the darker areas.

Speaking of taking it underwater - this involves being around wet conditions. So it’s very comforting that this lens includes weather sealing in 11 locations.

Another refreshing change from my DSLR lens is the Olympus 7-14mm lens includes amazing close-up shooting capabilities, with a minimum working distance of just 7.5cm. This is a great feature, especially while shooting underwater and there isn’t the option to switch lenses. The lens port I use is pretty big, so I could not even get the lens closer than it’s focus range. But I was able to get at least within a foot of the subject and still had crisp focus.

I am also really happy with the size and weight of this lens. It is bigger than many other mirrorless lenses, but for the quality, it needs to be. Even though it’s bigger, the weight is still pretty light. For me, it seems really lightweight coming from DSLR lenses. It weighs just under 19 ounces. For underwater, I use the Nauticam NA-GH4 housing with a Nauticam 180mm Optical Glass Dome Port and the N85 to N120 55mm Port Adapter. I was also using an arm system with two iTorch c92 video lights (Read review here). I added two medium sized 10Bar floats to the arms - that  combined with the amount of air around the lens, made the system close to neutrally buoyant.

At first I was a bit concerned that the hood on the lens is permanent. But, this has not been an issue and I have actually come to appreciate it. It’s pretty brilliant how the front dome lens element moves back and forth independent of the hood. Since the front lens moves forward as you go wider (toward 7mm), it prevents vignetting at the widest focal length. But, the lens does not extend beyond the confines of the top/bottom of the hood, so there is still some protection and shade provided. Another bonus, the pinch-style lens cap that is included to fit over the hood is deeper than most lens caps, so it fits much more secure.

Something that was new to me is the MF “clutch”, I must say, it does make it quicker & easier to switch back and forth - rather than a little button on the side of the lens like I’m used to. But, you also have to be more careful to not accidentally have it in the wrong mode - especially if you are putting it in an underwater housing.

I would definitely recommend the Olympus 7-14mm f/2.8 lens and I look forward to creating many more images and videos with it.

Monday, December 7, 2015

i-Torch Venom c92 Video Light Review

By Margo Cavis
After years of using older and less powerful lights, or relying on filters and manual white balance, I had the pleasure to test out the new iTorch Venom c92 video lights. The results were undeniably improved, with clean, vibrant colors and far more detail. So... I will never go without good quality video lights again.

The i Torch Venom c92 produces a nice, even light with 4000 lumens of brightness. I loved the LED read-out so I always knew exactly what power setting each light was on and I could be sure that both lights were set the same. I also was able to easily remember what power setting I needed for what type of dive, because of the number display. The fact that there are two buttons also made control of the light much more user friendly - one to control the mode and one for the power level, making things super clear cut.

It uses a COB light emitter, which is more balanced than a normal LED array. The light has a high 92 CRI index, making it very close to balanced daylight lighting. When using the Venom c92, it was very hard to see the edge fall-off (edge of the light beam) with the naked eye, but later when editing the footage, the edge fall-off was obvious in some shots. I would like the edge fall-of to be more gradual, but the only time this became an issue was when I had to keep moving and adjusting the lights to swim through wrecks - or inside the tight space of the wrecks. But this is partly because of the close quarters. As long as I had my lights aimed correctly, everything in frame was evenly lit, with the edges falling off screen and a nice gradual fall-off for things in the background or distance.

The Venom c92 has a two button control layout with an LED showing the power setting. One button is for mode the other for power, so controlling it for video was much easier than having to ramp through a long series of modes and powers with a single button. There is also a remote control available that uses fiber optic cords to control the power. The two powers of red light are useful for night dives or it can be used as a focus light. The red light is pretty bright, so I also experimented with using it on a shallower dive - to see what type of effect it had. I think it does make an extra level of color correction similar to a red filter, so it’s worth trying out.

The Venom c92 is powered by a rechargeable lithium cell that is enclosed in the tail of the light. To recharge it, you unscrew the tail of the light and plug it in to the supplied charger. The charging was the only part I wasn’t happy with - since the charging cable did not fit very securely into the battery unit. So after one attempt to charge failed due to the cable falling loose - I made sure to always leave the battery half attached to my armature system, then wrap the cord around the arm so it would not fall loose. When the lights were fully charged, I was left with more than enough power for a 2 dive trip.

Overall I was very happy with these lights. They are an excellent choice for underwater video.

Below is a video shot side-by-side with and without lights. You can see how much more detail, sharpness and color proper lighting can bring out. You can see more of my videos on the Optical Ocean Sales YouTube Channel.


Translate