Thursday, January 21, 2016

Olympus EPL-7 with Nauticam WWL-1 & CMC Lens Review

The Nauticam WWL-1 Wet Wide Lens features a sharp 130° FOV.
Nauticam’s new WWL-1 (Wet Wide Angle lens) and their CMC-1 (Compact Macro Converter) have showed how far the quality of wet lenses has come. They are specifically designed for mirrorless and compact cameras are much sharper, and have very little, if any, distortion or aberrations that were common in previous wet lenses. Nauticam has shown good results with these lenses on their own housings with higher-end Sony, Panasonic and Olympus cameras. But when I first saw the WWL-1 lens at DEMA, I was intrigued to see if it would work with a less expensive Olympus PEN E-PL7 camera and carbonate PT-EP12 housing that came out a year or so ago. Would the WWL/CMC system be versatile enough to work on a 3rd party housing?

The Olympus E-PL7 is a camera and small housing that we liked at first look, but was hampered by Olympus’s insistence that the small port that comes on it can’t be changed. It like all Olympus PEN housings can easily be changed - there’s a small set screw and the port just twists out on a bayonet. Zen and other third party ports for wide angle can then be used.

The Olympus PT-EP12 housing only supports the 14-42mm EZ electronic zoom “pancake” lens. Which is the lens that’s compatible with the Nauticam WWL-1 lens.

The Olympus 14-42mm EZ
also is a nice fish portrait lens.
But would the WWL and CMC fit and how good would the quality be? I talked briefly with Edward Lai, Nauticam owner and he said it should work - if the port fits close enough. That’s necessary to get the proper fit between the optics. Testing it in the store, it looked fine, even while using the Nauticam locking bayonet mounting system on the Olympus 67mm threaded port. Fitting the bayonet to the Olympus port worked fine, you only have to remove two set screws from the mount. While this could cause it to rotate on the port, we found that by tightening it well friction held it in place just fine. I took both lenses on and off underwater without a problem.

I outfitted the PEN 7 system with a couple of Sea & Sea YS-D1 strobes along with two sets of 10Bar arm floats. The WWL is a heavy glass high quality lens. Out of water, it weighs about 3.8 pounds. In water, I’d guess less than 3 pounds. So some floats are necessary to make it more neutral. The four 10Bar arm floats worked out well, balancing it nicely.

On a recent short trip to Hawaii’s Big Island at Kona, I was able to take the rig on a couple of dives. I was hoping to find some big animals to try out it’s 130° field of view, but never saw them below water. But I had some fun on the reefs, tried a few general shots, and “herded” around a school of goatfish.

The Nauticam CMC Macro Converter lens is free of aberrations.
The E-PL7 camera shot well, certainly rivaling it’s “big brother” the OM-D EM-5II in image quality. And actually it’s the same camera in many ways, without the viewfinder, direct controls, or weather-sealing. The “innards” including the sensor, processor and so forth are the same. But as a DSLR shooter, I was a little frustrated at it’s slower AF and overall I found it slower to use. I much preferred the Olympus OM-D E-M1.

But it depends on your perspective, I think someone upgrading from a compact camera would be quite pleased with it's sharpness and versatility.

Olympus never did make a zoom gear for the 14-42mm EZ lens, you have to do a quick button assignment to toggle the camera to zoom electronically using the left-right buttons on the back of the housing. This would work very nicely with full “zoom-through” focus from 14 to 42mm using the WWL lens.

The CMC also has a bayonet adapter which is very handy for it and the SMC; I’d say a “must-have” instead of trying to screw these lenses on and off. A flip holder from Nauticam or Saga is probably easier, but they are a bit expensive for some budgets and you can’t put a wide angle lens on them. The Nauticam bayonet is not compatible with other diopter lenses such as those from ReefNet and others that have a flat bottom.

On the same dive I tried switching it out the WWL wide lens with the CMC diopter for some macro shots. This means you need to park the 3 pound WWL lens on a Nauticam bayonet lens holder on an arm, which is not really the most balanced idea. It does work, but is quite awkward. I actually just laid it on a rock for a bit while shooting the macro CMC lens.

Unlike fixed macro lenses, you can zoom in and out
with the 14-42mm EZ and CMC combination.
The CMC lens shot fine and could be used from about 16mm to 42mm. Below 16mm, it vignettes with the bayonet adapter. Most people want more magnification and are using it for the 42mm end of the lens scale. Shots had little, or no, distortion and were pretty good quality for a “non-macro” lens with diopter. At approximately +15 in comparable magnification I was able to do nudibranch head shots easily.

So was this a setup I would recommend? Maybe, maybe not. Cost wise you are starting out pretty reasonably; $499 for the Olympus PEN E-PL7 and 14-42mm EZ lens, $759 for the housing. But you are adding on a $999 WWL and $320 CMC lens to the equation. But it’s still about $1000 or so less than a comparable E-M1 or E-M5 MKII and 8mm FE lens and Zen Port system. And more convenient - part of the savings is having to pack lenses and ports around.

Macro and wide angle on a mirrorless camera - all on one dive!
But the "kit" Olympus 14-42mm lens has it's limitations; it's never going to be as sharp or as powerful as a high quality, prime lens like the Olympus 8mm FE Pro or 60mm macro lenses.

If you’re thinking about a smaller, mirrorless camera set-up, particularly if you want video with an electronic zoom capability, this would be a good, versatile, value-priced option indeed. — Jack Connick

Wednesday, January 6, 2016

Nauticam Panasonic GH-4 Review


I recently took a dive trip to Bayahibe, Dominican Republic to do underwater video. But, before my trip, I finally had the opportunity to upgrade my underwater photo/video system. 


Working in an underwater photography store for over a year now has given me a lot of time to think about what camera system would work best for me. It has also made me aware of a huge amount of technical information as well as the opinions of many other underwater photographers. Sometimes I think that made it harder for me to decide (as I have changed my mind several times over the past year) because I know of so many options.

I actually got my start on an old MX10 film camera, then upgraded Olympus digital cameras. But, until recently I have been using Canon crop frame DSLRs for about 8 years for photography as well as a Canon HD Camcorder for dedicated video. My latest Canon DSLR (purchased in 2013) was an attempt to combine photography and video in one system. But the Canon t4i / 650D, while great for photography, fell short on underwater video - due to the lack of smooth autofocus while underwater. 


So, after a year of waiting and researching, I finally decided to get the Panasonic GH4 (even though it had already been out for quite some time), since I had started doing more video than photography, but still wanted the option to do both. I also liked the idea of being able to shoot 4K video and the fact that (with an adapter) I could still use all my expensive, high quality Canon lenses while I was not underwater. The GH4 also has a huge number of options for HD video formatting. For this trip, I chose .mov files - 1920x1080p at 60fps since I was shooting wide angle and wanted the higher frame rate for more detail in movement. For more ideas on specific camera settings read the Setting Up the Panasonic GH4 for Diving article.

But I still needed a mirrorless lens for underwater. Since the majority of my underwater video has been wide angle I decided to get the Olympus MZ ED 7-14mm f2.8 PRO lens as my first lens. I was a little concerned about finding mirrorless lenses that would measure up to the Canon lenses I was used to, but this lens sure does! It does a really good job for wide-angle shooting - as well as close focus wide angle - in any condition. (See my review of the Olympus 7-14mm lens here.)
For my housing, I chose the Nauticam NA-GH4 Housing with a 180mm Optical Glass Dome Port and the N85 to N120 55mm Port Adapter with Knob. Since this is all a really big investment, I added the Vacuum system to the housing for extra security. I chose Nauticam for many reasons, including ergonomics and durability. All the buttons are so well thought out, making them second nature to use. I am also very impressed with the port system. The port and adapter is very easy to assemble and lock to place, so that I know without a doubt that they are secure. I hope to add additional lenses and ports in the future, and there are so many to choose from. That is another reason I chose Nauticam - the fact that I can easily “grow” this system. One thing on the top of my wish-list, since my focus is mainly on video, is a SmallHD 502 monitor with a Nauticam NA-502 housing.

On this trip, I also had the pleasure to demo two 4000 lumen i-Torch Venom c92 video lights. To hold the lights, I used i-DAS arms with 2 medium sized 10Bar floats added to the arms. That, combined with the amount of air around the lens in the dome port, made the system close to neutrally buoyant. (Check out my review of the i-Torch Venom c92 Video lights here.)


On my first dive day I decided to just take the camera and housing (no arm system or lights) so that I could get used to the camera underwater in a less bulky manner. This worked well for me to get confident with a new housing and it also made me super excited to the bring the lights the next day - since, even with some manual white balance, my footage was flat and too blue without the benefit of lighting. Plus, I found out I would have the chance to go wreck diving the following day! That is a “must have lights” dive for sure.

When shooting the GH4 underwater, from here on out, I used some manual white balance, plus the 2 iTorch c92 4000 lumen lights. I set the manual white balance ahead of time using a few different shades of blue - for different depths. Since I did not have a dive buddy and I wanted to limit underwater fiddling around with gear, I tried to have as much set up ahead of time as possible. I found this method of manual WB plus lights, worked the best for all situations except when there was no blue light (natural light filtered through the blue water). On my dives, this only happened in the vary dark areas of shipwrecks, but the same would be true for night dives. On those occasions just the lights, with auto white balance is good.

In Bayahibe, most of the diving was not very deep - about 40-60 feet average, but the first wreck dive, the St. George was deeper: Bottom - 144ft, Stern - 102ft and Top - 50ft. We did not go to the bottom, but we swam through many of the upper rooms at around 90-100ft. This depth, combined with the loss of light inside the wreck made nice bright lights essential for good footage


Since the water had high visibility I used the lighting position in the above
illustration, being careful to make sure the lights are behind the front of the dome port. While diving through the wrecks, I did have to keep repositioning the lights in order to be able to fit through doorways and other openings. So, sometimes I could not have the lights in ideal position while inside the wrecks. Because of this, occasionally the edge of the light was visible. I do wish the edge fall-off was more gradual, but other than that, the light from the c92s was perfect. For most dives I kept the light power between 7-9, I only turned the brightness down for very shallow shots.

I was very happy with my new system, it is a huge upgrade from my old Ikelite housings and lights. Everything felt so much more secure as well as just better engineered. The Nauticam handles are very ergonomic and all the buttons and knobs work so smooth and precise. The white balance button on the housing threw me off a little at first, as it’s a little hidden on the side. But once you know it’s there, it’s super handy positioning. I also really liked having the green light from the vacuum system - telling me everything is airtight - before I even jumped in the water! The i-Torch c92 lights offered nice bright and even light. The GH4, combined with the Olympus 7-14mm lens worked very well to give my footage great detail, color and focus. —  Margo Cavis, Optical Ocean Sales


Monday, December 21, 2015

Nauticam Sony a7II with WWL & 90mm Lenses Review

Shortly before heading to the Philippines, customer Tor Trygstad decided to upgrade his Nauticam Sony RX100 compact system to the new, full-frame Sony a7llr MIR in a NA-A7II Nauticam housing. Although he really likes shooting macro, and housing the Zeiss 90mm macro lens was his first lens choice, he was impressed with the new Nauticam WWL-1 “Wet Wide Angle” lens system that works with the Sony 28mm f/2 lens.

“It was less expensive and much smaller than housing the Zeiss 16-35mm lens,” Tor said, “and having that ultra-fast Sony f/2.0 lens, coupled with the low-light capabilities of the Sony a7rll sealed the deal.” However, he did find it a bit heavy in the water and has added some additional floats. “It’s a lot of glass, he added.”

The Sony a7Rll was quite a step up for him from the RX100, although some of the layout of the menus is similar. He felt that the a7IIr has a great control set, and that he could make changes rapidly. “For my skill level this is invaluable for getting the shot right!”, he stated. One of features Tor liked most about moving to the advanced a7IIr SLR was a separate AF lock button - he ended up using it exclusively of the half-press shutter button; although you can lock AF either way. But locking it down and then recomposing by using the “back button” AF lock seemed easier after getting used to it.

Tor also said that with the with the Zeiss 90mm macro lens focus would hunt at times, or locked inconsistently. Using the focus preview helped quite a bit. Focus peaking and the magnified view display features the camera offers in manual focus are a better answer, so a manual focus gear was the first thing he bought upon his return.

One of the problems he had was that Live View Display comes turned on as a default on this camera (and some others like the Olympus E-M1). It shows the effect the aperture or exposure compensation setting has on the display while in manual camera mode. The result is that the display is very dim and hard to see. “A quick email to Jack at OOS, and he sent the instructions to disable that feature”. (Under Menu: Live View Display, turn feature off).

The Nauticam housing really impressed him. “Another flawless Nauticam experience,” Tor stated. “The controls are so well laid-out and the vacuum leak system was easy to work. It really took the worry out of taking my new system underwater.”

He added, “The only issues I had with the controls was that it was a little easy to hit the video record button. However, there is a camera setting to prevent that. I also occasionally nudged the exposure compensation wheel as well. But that’s pretty normal while getting used to new equipment.”

Tor used two Sea & Sea YS-D1 strobes, along with Nauticam’s flash trigger for fiber optic firing of them with manual control. “Manual is all I ever use anyway, it gives me better control than TTL”. You can buy the housing with electrical bulkheads as well. We have found that the new Sea & Sea YS-D2 strobe currently has inconsistent operation with flash triggers, due to a less-sensitive sensor on the strobe. Sea & Sea and Nauticam are aware of the problem, and are working on a solution for the new YS-D2 version of the strobes. Inon and Ikelite strobes don’t have that issue with the flash trigger.

Tor’s bottom line on the Nauticam a7 II system? “I ended up with far more keepers than normal. I continue to be impressed with Nauticam housings and Sony cameras, and this was without a doubt the easiest and most rewarding photo week yet!”

Tuesday, December 8, 2015

Olympus 7-14mm f/2.8 PRO Lens Review

When deciding on a lens for my new Panasonic Lumix GH4 camera body, I chose the Olympus M. Zuiko Digital ED 7-14mm f2.8 PRO lens over a Panasonic lens, and I have been extremely happy with my decision. I just recently started shooting Mirrorless and after years of using only high quality Canon lenses, I was a little concerned about finding mirrorless lenses that would measure up. This lens sure does!

The Olympus M. Zuiko 7-14mm f/2.8 PRO lens is a really good choice lens for wide-angle shooting - as well as close focus wide angle - in any condition.

One of my first happy surprises was the image and color quality while shooting in the low light conditions - just before sunset. The images were so crisp and vibrant at a time when most lenses would just give me flat, muted results. In the example to the left I took a simple picture of my dog, but I really liked the result - there are so many colors on the beach, the reflections on the water and even in the sky… colors that other lenses and even many times the human eye, might miss. This was great news for me since I am an underwater photographer/videographer where lighting and color are always challenging. For example - the shipwreck had very challenging light, but even with the extreme light at the top, the details can still be seen in the darker areas.

Speaking of taking it underwater - this involves being around wet conditions. So it’s very comforting that this lens includes weather sealing in 11 locations.

Another refreshing change from my DSLR lens is the Olympus 7-14mm lens includes amazing close-up shooting capabilities, with a minimum working distance of just 7.5cm. This is a great feature, especially while shooting underwater and there isn’t the option to switch lenses. The lens port I use is pretty big, so I could not even get the lens closer than it’s focus range. But I was able to get at least within a foot of the subject and still had crisp focus.

I am also really happy with the size and weight of this lens. It is bigger than many other mirrorless lenses, but for the quality, it needs to be. Even though it’s bigger, the weight is still pretty light. For me, it seems really lightweight coming from DSLR lenses. It weighs just under 19 ounces. For underwater, I use the Nauticam NA-GH4 housing with a Nauticam 180mm Optical Glass Dome Port and the N85 to N120 55mm Port Adapter. I was also using an arm system with two iTorch c92 video lights (Read review here). I added two medium sized 10Bar floats to the arms - that  combined with the amount of air around the lens, made the system close to neutrally buoyant.

At first I was a bit concerned that the hood on the lens is permanent. But, this has not been an issue and I have actually come to appreciate it. It’s pretty brilliant how the front dome lens element moves back and forth independent of the hood. Since the front lens moves forward as you go wider (toward 7mm), it prevents vignetting at the widest focal length. But, the lens does not extend beyond the confines of the top/bottom of the hood, so there is still some protection and shade provided. Another bonus, the pinch-style lens cap that is included to fit over the hood is deeper than most lens caps, so it fits much more secure.

Something that was new to me is the MF “clutch”, I must say, it does make it quicker & easier to switch back and forth - rather than a little button on the side of the lens like I’m used to. But, you also have to be more careful to not accidentally have it in the wrong mode - especially if you are putting it in an underwater housing.

I would definitely recommend the Olympus 7-14mm f/2.8 lens and I look forward to creating many more images and videos with it.

Monday, December 7, 2015

i-Torch Venom c92 Video Light Review

By Margo Cavis
After years of using older and less powerful lights, or relying on filters and manual white balance, I had the pleasure to test out the new iTorch Venom c92 video lights. The results were undeniably improved, with clean, vibrant colors and far more detail. So... I will never go without good quality video lights again.

The i Torch Venom c92 produces a nice, even light with 4000 lumens of brightness. I loved the LED read-out so I always knew exactly what power setting each light was on and I could be sure that both lights were set the same. I also was able to easily remember what power setting I needed for what type of dive, because of the number display. The fact that there are two buttons also made control of the light much more user friendly - one to control the mode and one for the power level, making things super clear cut.

It uses a COB light emitter, which is more balanced than a normal LED array. The light has a high 92 CRI index, making it very close to balanced daylight lighting. When using the Venom c92, it was very hard to see the edge fall-off (edge of the light beam) with the naked eye, but later when editing the footage, the edge fall-off was obvious in some shots. I would like the edge fall-of to be more gradual, but the only time this became an issue was when I had to keep moving and adjusting the lights to swim through wrecks - or inside the tight space of the wrecks. But this is partly because of the close quarters. As long as I had my lights aimed correctly, everything in frame was evenly lit, with the edges falling off screen and a nice gradual fall-off for things in the background or distance.

The Venom c92 has a two button control layout with an LED showing the power setting. One button is for mode the other for power, so controlling it for video was much easier than having to ramp through a long series of modes and powers with a single button. There is also a remote control available that uses fiber optic cords to control the power. The two powers of red light are useful for night dives or it can be used as a focus light. The red light is pretty bright, so I also experimented with using it on a shallower dive - to see what type of effect it had. I think it does make an extra level of color correction similar to a red filter, so it’s worth trying out.

The Venom c92 is powered by a rechargeable lithium cell that is enclosed in the tail of the light. To recharge it, you unscrew the tail of the light and plug it in to the supplied charger. The charging was the only part I wasn’t happy with - since the charging cable did not fit very securely into the battery unit. So after one attempt to charge failed due to the cable falling loose - I made sure to always leave the battery half attached to my armature system, then wrap the cord around the arm so it would not fall loose. When the lights were fully charged, I was left with more than enough power for a 2 dive trip.

Overall I was very happy with these lights. They are an excellent choice for underwater video.

Below is a video shot side-by-side with and without lights. You can see how much more detail, sharpness and color proper lighting can bring out. You can see more of my videos on the Optical Ocean Sales YouTube Channel.


Saturday, November 28, 2015

Sale on Underwater Photo Equipment!

On Now!

Sea & Sea TTL YS-D2 strobes $70 off! Now just $649! Now Extended until Dec 26th! New model with better controls, 2-step brighter target light, faster recycle. lighted modes and other improvements.

All of our single and double lighting packages and YS-D2 systems are also on sale - save up to $140 and combine with great Olympus prices on cameras and lenses!

Olympus cameras $80-$400 off! Lenses $50-$150 off!

Lots of lights, housings and more at great prices. Limited quantities, so act quickly!

See our On Sale section on the webstore.
For details see: http://eepurl.com/bGtzk5

Wednesday, November 11, 2015

DEMA Underwater Photography Equipment Highlights

Speakers like Amos Nachoum shared astounding images and stories at DEMA.

Every year the Diving Equipment & Manufacturers Association has their annual tradeshow with lots of new products being introduced. It has become the best worldwide meeting spot for all industry people, with a large contingent of underwater photography folks and companies present. I look forward to going each year and seeing with present vendors and meeting new and old friends.

This year it was held in Orlando, Florida and it seemed to many of us to be a year with many improvements and product line expansions, but with few earthshaking photo product introductions. Nevertheless, there are many new products that will be coming available soon or in the first quarter of next year.

Nauticam
I talked with Edward Li and Ryan Canon from Nauticam for quite a while about their new Wet Wide Lens 1 that was recently introduced. It is a wet wide angle lens that can be added to many cameras including compacts, micro-four thirds and even the A7II series. It is used with the shorter normal focus lenses to extend their field of view to 120-130° with very sharp corners, unlike many lens solutions available currently. For compacts like the RX100 series with a 24mm lens it does require you to zoom in a bit. However it now provides full zoom-through which is important for video and previously only available on very high-end Fathom lenses for video cameras. For micro-four thirds when combined with the small 14-42EZ lens in  short port it can be used in conjunction with the CMC to switch from wide angle to macro on a single dive. For full-frame mirrorless cameras like the A7II, it provides a more reasonably cost-efficient, very high-quality and physically smaller wide angle solution, than current mid-range zooms.

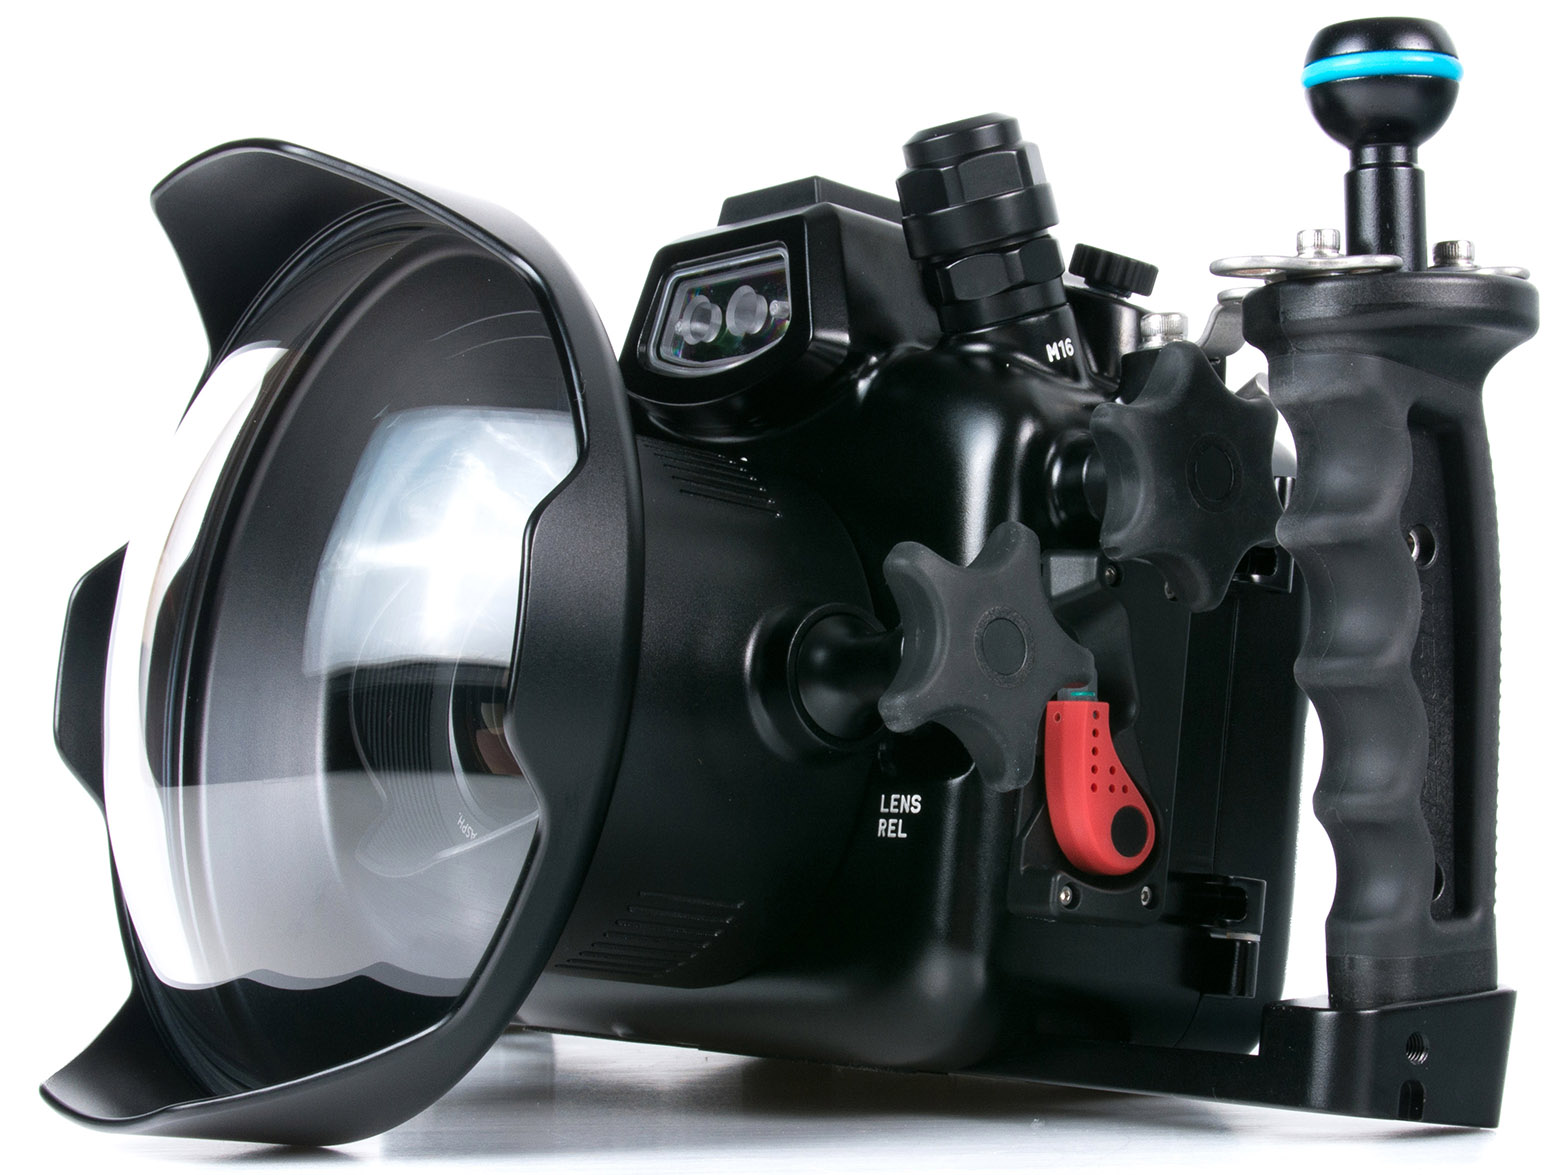
New also is their rugged and easy-to-use bayonet mounting system for 67mm lenses like the WWL-1, CMC and SMC macro closeup lenses. I’ve used the Inon bayonets in the past and while they worked pretty well, the Nauticam adapter handles large lenses like the WWL-1 with ease and it’s larger knurled mounting ring and red release lever make mounting simple and more secure. They will also have a arm mount in single and double configurations so that you can park the lenses while not in use.

Nauticam has also just released their new Panasonic GX8 and Olympus E-M10II housings. Funny how they were almost an afterthought to the WWL optics. Both will work well with it.

Sea & Sea
Sea & Sea continues to improve and create it’s underwater photo line up. They were showing off their new and improved YS-D2 strobe and MDX-EM5MKII housing for the Olympus EM5MKII, as well as their new A7II housing. These products are more evolutionary than revolutionary, but really shows their attention to detail and dedication to the market. They also support and extend Sea & Sea’s unique optical sync technology with their TTL controllers available for most of the MDX line-up.


Ikelite
Ikelite has been very busy rethinking and redesigning their housing line up. Coming into the new year they will have a new port locking system based on their successful micro four-thirds port system. Now there is a locking collar on the ports that fits over an o-ring on a sleave on the housing. It seems to be a better, yet simple method that doesn't require that port latches are moved into position and secured. You simply tighten 3 screws on the port collar, like changing a light shade with the o-ring remaining in place.

Also new is that they will be making a housing with a new lighter weight, opaque grey material. They are combining this into a simpler, “splash” surf-type housing line up. The housings will have fewer controls and strobe support and are much lighter and a little less-expensive. This will be the perfect type of housing for those wanting to do shallow water photography while snorkeling, surfing, or in the pool. Backs and fronts of the dive and surf housings will be interchangeable as well.

I really like the out-of-the-box thinking that this approach is showing and look forward to the additional new line-up.


Keldan
From Austria, Keldan was there with a huge new 24,000 light. Mainly directed to commercial photographers, to have this amount of high-quality lighting in one light is amazing. They have thought through the 100-watt li-Ion battery restriction by breaking the battery packs into three 100 watt  sections that are assembled into one pack.

He also has been hard at work on a new line of filters for both cameras and lights to provide a daylight balanced lighting solution thats much more natural. Kelvin first showed this approach with it’s Cyan head, balanced for an average depth in blue tropical water. Balancing the artificial light with ambient light removes many weird color balance shifts as the underwater lights play along with the surface lighting and make it much easier to shoot more natural video.

Keldan has now extended this by taking a colorimeter underwater and measuring the color temperature at different depths. He then has created 3 filters that can be added to Keldan lights to balanced their color temperature at those depths. He also has done the same with 3 filters for camera lenses which will be available in a few sizes to mount internally.


Big Blue Lights
Big Blue now has a huge line up of lights; with some 16 variations available. Most of their popular models like the Black Molly remain, but now also have an additional “warmer” mode available that mixes the red light with the white to lower the “blue” color of most LEDS from 5500K to 4500K. This results in better flesh tones and blue water white shooting video.

They also have reduced the size and made even higher output lights. Their large 15000 lumen light from last year now is a much smaller unit and is also a third less expensive. Taking the old larger form factor they have come out with outrageous 25,0000 and 30,000 lumen lights. These lights will be great for wreck and cave photography.


iTorch/I-Divesite

Kelvin Lee at iTorch has been busy creating a cool new product; a combination strobe and video light! The new Symbiosis Lighting System has a 1000 lumen video light grated onto a strobe! The strobe has a very powerful guide number of 32 with a 90x80° beam angle, or by using a diffuser, a guide number of 24 with a 100x100° beam angle. With the standard two manual modes it has a highly adjustable 15 level output. It uses an interesting auto mode that learns when you shoot it. For example, if you shoot it at f/5.6 and approve that output, it will then automatically adjust it’s output to different apertures while you shoot. it uses a rechargeable battery pack that should last for 400 flashes at high - enough for the day for many people. The light can be upgraded to 2500 or even 4000 lumens! It can also be used as a stand alone with an adapter. There are plans for a smaller unit (Symbiosis-1) with a guide number of 24 - 16 with diffuser. The unique all-in-one solution should be very popular with many divers. It should be available in late Spring of 2016.

They also have a new light that is shipping now and have lowered their pricing on others. The new Fish-Lite Green Star light has 2400 lumens and a small form factor with two rechargeable batteries. The nice thing about this light is that it has two buttons; one to control the mode from white or red, the other to turn it’s intensity up and down.


Travel
I met with several of my travel vendors and saw my friend Alberto from Dive Damai again. He “twisted” my arm into a new booking for Indonesia in November of 2018; from Ambon to Kupang - this would take us through the Forgotten Islands and the rarely dove areas in the south of Alor, finishing in Kupang.

Aggressor Fleet has a new boat for Sri Lanka (think wrecks, whales and all sorts of great adventures) that we have also booked for 2 weeks in the Spring of 2018! I have also booked several other exciting new trips for 2016 and 2017 - look for some announcements and details shortly!

The above are just a few personal highlights. I also met with my friends from Saga Dive, 10Bar, Fantasea, Xit404 among many others. Many of them have many other new and improved products coming out in the near horizon, but I was sworn to secrecy!

Sunday, November 1, 2015

i-Torch v25 FishLite Focus/Video Light Review

i-Torch with their sub-brands Venom and FishLite, has been making lights for many years now. Located in Hong Kong and distributed through i-Torch Canada, owner Kelvin Lee has produced innovatively designed lights that are a good value with their quality design, output and beam strength.

This year they brought out the I-Torch v25 FishLite. At first we thought it was an update to their older and popular V24 light, but in actuality if was a new product somewhere between their more expensive Pro6+ light and the V24. With the same 2800 lumen output, and adjustable white and red output, it also has the same size as the Pro6+, only lacking the purple color used for fluorescence photos. Most divers don’t miss this and they don’t miss the higher $450 price of the Pro6+ either.

The V25 FishLite has 4 steps of white, and two of red light, along with an SOS flashing mode. It’s switch has a built-in “airline” safety mode that requires 5 quick pushes to activate it, then a longer push to turn the light on and switch between it’s modes. It utilizes the now-familiar colored light bezel for relative remaining battery strength that changes from green to white to red as the battery runs down.

All of the iTorch lights come with a YS-mount and the V25 comes with two batteries and a separate charger. Changing the light to a ball mount is not currently possible, so a short YS-Ball arm must be used with a ball mount.

I had a chance to use the light as a focus/fill light quite a bit on my Solomon Islands trip as the airlines didn’t load my camera bag with strobes. I tried various cameras with it; an Olympus TG-4 in shallow water, an Olympus E-M1 on deeper dives, as well as an LX-100 and Sony A7II once my bags caught up with me.

The light worked very well in all conditions and it was neither too physically large, nor lacking in power. I used a small tray and arm to add it to the TG-4 without a housing and it allowed me to take close in photos quite well, giving a more even beam that the on-board flash. On the E-M1, I coupled it with the amazing new Olympus MZ 8mm f1.8 PRO lens as a fill in light, shooting available light in deep water and using the V25 as fill to add a little color and detail for close focus/wide angle shots. With the LX100 and Sony A7II, it was bright enough to used for focus, even at wide angle, in darker conditions.

The V25 battery easily lasted an hour, as it is rated at a 70min burn time on high. I rarely used it on high, and turning it up and down greatly extends it’s burn time. Having the extra battery ready-to-go on the charger, meant I never had to wait for a recharged light, and the battery charges quickly.

About the only negative of the light (and this is true of all single push button lights) is that to turn the light back up to high from a lower level, meant that you have to cycle through all of the mode settings. This can result in a lot of button pushing. More expensive lights, like the ITorch Venom series and Fix NEO lights have multiple buttons for mode and power.

The construction quality of the light held up well over the 25+ dives I did, with a twin o-ring seal (most all lights now have this) and aluminum construction.

The red light mode found on this light and others, is quite useful for night dives, saving your night vision and attracting much less krill that spoil shots with backscatter. It’s also useful while shooting shots of squid, crab, octopus and other critters who can’t see red light well. Most fish are still wary, but it does create a more calming tone.

The light was plenty bright to use as a dive light in the clear tropical waters I was in, but the wide 110° beam would dissipate quickly in more turbid conditions.

None of these lights have an auto off-on sensor, you just need to shoot faster than about 1/100 of a sec. Your strobes will wash out the light beam.

I didn’t get a chance to shoot video with this light, but my sense is that it should work fine for many compact cameras. For more serious videographers, it’s a bit underpowered at 2800 lumens as a true standalone video light, and having to push buttons down through red modes while shooting video would be tiresome. It therefore is more of an “all-in-one” focus/video light. But for power and quality at it’s low $349 price point, it’s hard to beat, and is one of our favorite lights this year.

Translate