Tuesday, October 27, 2015

Five New UW Photo Products We Like & Stock!

Here's just 5 of the many new exciting products that we've recently added! We've also updated and added many new System Packages. We'll have lots more new products coming after DEMA, stay tuned soon for more!

Nauticam WWL11. Nauticam Wet Wide Lens 1 This new "wet" optic from Nauticam is revolutionary in that it can be used with a wide variety of cameras; compacts like the Sony RX100 III and IV, or Pansonic LX-100, as well as Olympus and Panasonic m4/3rds with a small pancake 14-42mmEZ lenses, and even the Full-Frame Sony A7II with their 28mm lens. It's a 67mm mount and has amazing, sharp corners and about 120° FOV (varies with camera lens).
$995includes covers and a carrying case.


Saga Double Flip Holder2. Saga Dive Single and Double Flip
Diopter Holders
These high-quality flip diopter macro lens holders fit any 67mm threaded port, including Sea & Sea, SEACAM, Nauticam, Olympus, and others. Double version holds two lenses at the ready! Anodized aluminum with spring loaded "de-dents" that hold it open or closed.
Single: $229.95 Double: $294.95


10Bar Snoot with Laser Aiming Light3. 10Bar Strobe Snoot with Laser
Aiming Light
This aluminum snoot fits tightly to the front of the YS-D1 or YS-D2 strobe and has 5 sizes of openings. Used to shape the light to smaller amounts and direct it on or near the subject, snoots are very popular, as they eliminate background lighting and backscatter behind the subject. But they can be hard to aim.
Now 10Bar has added a laser aiming light with an auto shut-off. When the strobe fires, a small fiber optic cord turns the laser off, then back on automatically. There are 5 opening rings that screw off to adjust the light opening.
Read a review by "Go Ask Erin"!
S&S YS-D1/D2 model: $224.95 Inon z240 model: $199.95


Fantasea RX100IV Housing4. Fantasea RX-100III/IV Housing Made from high impact carbonate plastic, controls for all functions are labeled, ranked at different heights and easy-to-use. We like the design and quality of these value-priced housings. The round port allows it to be used with wide angle lenses. The camera just drops in and it comes with a leak detector, hand strap, diffuser, screen shade and port cover. Fits RX100III & IV $495


10Bar Arm Floats5. 10Bar Closed Cell Arm Floats
10Bar Arm FloatsHigh Density Foam Buoyancy Floats fit on lighting arms to provide a more neutrally buoyant system. Rubber stoppers slide on arms to for secure attachment. Closed cell foam sheds water and won't distort or flood at depth. Available in 3 sizes and as 8" or 11" arms.
Floats are $20-31.50/2 Pack, Arms $59.95

For more great Deals see our new Emailer!
Five New UW Photo Products You've Got to Try!


Tuesday, October 20, 2015

Sea & Sea YS-D2 Underwater Strobe Review: The Best Got Better.


Long a major manufacturer of high-quality underwater strobes, Sea & Sea turned the world on it’s ear a few years ago with the introduction of the YS-D1 underwater strobe. Small, very powerful and adjustable, it's become a standard for many photographers. Recently Sea & Sea released a revised YS-D2 strobe model.

Featuring a whopping guide number of 32, the strobe has manual and auto D-TTL exposure which works with fiber optics on most cameras, and they even supplied a “slave” TTL mode for compatibility for newer cameras that might come out - ensuring longevity. Sea & Sea says that it was the first strobe to include actual .ev (exposure value) TTL settings. Inon has had something similar with its “auto” mode - but not in TTL. For those using electrical sync, it has a Nikonos bulkhead available. And to sweeten the deal, they even supplied your choice of mounts; YS and ball, along with two diffusers with 100 and 120 degree thicknesses, which cut the guide number down as they increase beam angle and soften the light.

There were annoyances with the YS-D1. Small switch dial knobs on the back were easily knocked to the wrong position if you grabbed the back of the strobe. It was hard to tell what mode you were in, and you had to look at the light on the bottom of the strobe to see if your TTL exposure was correct.

So Sea & Sea revised the strobe and released the new YS-D2 model to deal with these small issues. Basically it has the same specifications, but the back of the strobe was completely redesigned and a few new features added.

Round Up

Gone are the small flip knobs, replaced by a taller round knob with much better  “de-dents”. They rotate firmly, stay put and you can’t knock them out of position accidentally. The manual/TTL gauge was redone with the manual now on top and the TTL ev settings on the bottom. I’m not sure how much I like that - I find it a bit confusing in TTL to look at, although it makes sense numerically.

Colors Everywhere

But the star attraction is that the entire rear panel is lighted and changes color with the mode you’re in; yellow (manual 1), green (manual 2) blue (TTL) and light blue (slave TTL). This is easily seen underwater and if you switch from manual to TTL often, keeps things straight - especially if you’re using two strobes. No more looking at tiny knob pointers to see where they’re set.

Ready When You Are

The strobe now emits a tone when the strobe is recycled, which is my favorite new feature. I tend to get excited shooting action and overshoot my strobes. This allows you to continue to follow the action and when you hear the tone you know you’re ready to take a shot. The ready light at the bottom stills turns green and a tone now also sounds when you have TTL, then it goes red and a tone again sounds when the strobe has fully charged. Speaking of recycle time, the YS-D2 even has a very slightly improved recycle time.

On Target

The YS-D2 now sports a two power targeting light that is much brighter on high. But don’t get confused this is for aiming the strobe, generally not lighting your subject - focus lights are much brighter and wider. Many times you’ll be aiming the strobe out and away from your subject to reduce backscatter. Or doing more creative strobe positioning.

Other improvements include a divided battery compartment, and a much better YS bolt that’s easier to grip.

Real World

I took both the YS-D1 and YS-D2 on a recent trip to the Solomon Islands. The biggest improvement was the rear knobs, but I really like the audible tone and lighted back. Overall I found that the strobe needed much less attention than the YS-D1 did previously - I didn’t have to keep checking it to see if the control had moved, or take a bad shot sequence only to see the same issue.

Sea & Sea makes a big deal about the strobes working in EV and they do have very fine adjustment. D-TTL has come a long way from their older strobes and seems to be compatible with a much wider variety of cameras. And the “Slave TTL” can make it work with others.

However using the strobe in manual, I found that matching the f/stop on the strobe to the camera aperture to be inaccurate; exposure changes with many factors; camera lens, distance to subject, ambient light, clarity of the water not to mention shutter speed and ISO. But as a range of numbers it’s fine and having a 1/3 stop adjustment is very nice for macro.

Notice backscatter on the very edges of this shot.
I have found that I use the 100° diffusers all the time. I've found that the 120° diffusers are really too wide and cause backscatter at the edges of the frame. They also cut the light output to a guide number of 22, which is too weak for the ultra wide shots where you’d want that kind of coverage. Better to get some longer arms if that’s what you want to do.

TTL was fairly accurate with my Panasonic LX100 system (review here) and electrical sync worked very well in manual with a Sony A7II SLR. At times I mixed a YS-D1 and YS-D2 together and found that the YS-D2 recycled just a little bit faster. However it was hard to tell the difference, unless it was a nearly full dump. If you’re adding a second strobe, I wouldn’t be afraid to mix and match - they are basically the same strobe electronically; beam size, white balance and power are the same.

I've used “long lasting” NiMH MAHA PowerEx batteries and chargers for many years now and find them to be very consistent with fast recycling. In practice, I get two dives on a set, probably a little more, but it’s hard to change them underwater!

The YS-D2 strobes also fit light shaping devices like our laser shoot and fiber optic ring flash as the front of the strobe is unchanged.

Overall the Sea & Sea YS-D2 strobe is a nice update and underwater photographers should enjoy the new features that have been added.
Now on sale, $70 off - one week only!

Wednesday, October 14, 2015

Choosing an Underwater Camera & Housing, Part 2: Housing Systems


Protecting Your Camera & Making It Accessible

(Please see part 1, Choosing a Camera for Underwater Photography)

Underwater housings do several things besides the obvious of keeping the water away from your precious camera. They also protect from pressure, allow you to use camera controls, allow for different lens ports and gearing, and also hold other accessories like lighting in a complete system that you can swim with in an underwater environment. It is important to remember that they are only a part of that overall system and you need to take a holistic system approach when shopping for one.

Housings pretty much follow the major camera groups in terms of size, construction, design and features. But there are lots of variation and many manufacturers are carefully considering how divers use and travel with their housing.

Construction & Design Details: Controls, Ergonomics, Latches, Ports, Accessories

Materials: Generally plastic carbonate or milled aluminum. Finishes include anodizing and/or powder-coating.
Latches: There are several types: metal clip latches, latches integrated flush into the housing body, cam-lock, swivel. Ports also can have latches.
Controls: Are most if not all camera controls available? How easy do they work for you? Can you shoot without “looking up” to align a control? Are the buttons far enough away from each other to use with gloves? Are knobs smooth to roll and allow fine adjustments? Are controls dedicated to one function, or shared between several? Controls will work easier in the water as they’re designed to be under pressure.
Ergonomics: How is the layout of the controls? Can you reach them easily? What about the handles and feel of the housing in your hands?
Ports: How do they attach? Are they easy to work without difficulty? Generally the two systems are screw thread or bayonet. There are also systems where the port is held on with water pressure and small latches.
Size & Weight: How bulky is the housing? Most are close to neutral in the water. Don’t be overwhelmed by weight and size on land; housings are designed to be used in the water. Arm floats can be added to help. Even the largest housing is fairly easy to swim with, but every diver needs to be careful of their buoyancy and task loading.

Ports & Gears: Your Window to The World

DSLR, SLR, and even some compact housings use a separate port for housing lenses. These are generally sold separately. Light physics mean that as take optics underwater we loose 1/3 of our field of view (FOV) through refraction, dome ports correct for that loss and correct for blurry corners as the image bends.

Flat Ports: Are used for Macro lenses and some consumer mid-range lenses. They utilize refraction to magnify close-up subjects larger. Generally use optical glass.

Dome Ports: For wide angle lenses. Alters refractive optics to give a wide FOV by creating a “virtual” image just in front of the dome port for the lens to focus on. They can be acrylic or optical glass with mounts made of plastic or aluminum..
  • Acrylic: Less expensive and lighter in weight. Shoots quite well, but can have more reflections. Can be scratched easily, but are easy to polish.
  • Glass: More expensive and heavier. Gives the highest quality images with less reflections. Hard to scratch, but when scratched can be very difficult to repair or polish.
Lens Gears: Adjusts zoom and focus rings on the lenses. They are accessed from an external knob on the housing or port.
Are they easy to take on and off the lens and positive in actuation?

Wet Lenses - Extend The Possibilities

Add-on wet lenses can be used on the outside of ports. They can be changed underwater.

Macro “diopter” lenses:
Makes the image larger and allows closer focusing.

Wide angle lenses:
Gives a larger FOV. Can be either a refraction replacement or true wide angle that extends the field of view (FOV) of the camera.
 
Holders: A holder for macro lenses can be utilized to flip the lens in/out of position quickly. But they can’t be used with wide angle lenses as they cause vignetting (darker corners).


Accessories: Viewfinders, Leak Detection and other Options.

Consider how extendable the housing is for adding external monitors for video, viewfinders and other devices. A vacuum leak detection system can take the worry out of taking your camera underwater. Lanyards and rope handles make transporting your system easier.


Connectivity: Strobe Bulkheads and Ports

Strobes and lighting are very important underwater. There are two ways they connect to underwater housings:
Electrical Bulkheads: Uses an electrical signal to connect to the camera’s hotshot and trigger the strobe.
Fiber Optical: Uses a thin fiber optic cord to transmit the camera’s flash to an external strobe. The strobe mimics the camera flash and tricks it into turning on and off at the right time. No need for a physical hole in the housing, just a clear area for the light to go through. Fiber optic cords have become the new industry standard as they are less expensive and worry-free from flooding.
Flash Triggers: These work with cameras that don’t have a flash or can speed up the flash recycling or add TTL-auto operation. Make sure the housing you are selecting has the ability to install one if that ability is important to you.


Putting It Altogether And Creating Your Underwater Imaging System

When shopping for a camera and housing, don’t forget that they will become part of a larger underwater photo system that includes lighting, a tray and arms. Good lighting is as important, or more important, than a good camera underwater. Mounting points for arms and lights on the housing and handles, or even on macro ports are important. Be sure to budget for lighting while shopping for a camera and housing.

See our article and Handbook: Choosing an Underwater Lighting System for a details and information.

Part of the Basics of UW Photography Series Handbooks.

Tuesday, October 13, 2015

Choosing a Underwater Camera and Housing, Part 1: Camera Considerations

Introduction

Deciding on an underwater photography system to buy doesn’t have to be a bewildering experience. Cameras come in many different shapes and sizes, some are great for underwater use, some are not. Knowing the basic characteristics and classes of cameras and housings can help organize your choices. Then your personal preferences and budget can help narrow it down further to your best options.

Although there are several “amphibious” dive camera packages available, they tend to lag in features, construction and quality. They also tend to be closed, all-in-one packages that cannot use the best components that are industry standard accessories. So for the purposes of this article we are discussing cameras and housings purchased separately where you can buy the best available to meet your needs.

Here’s three tips when shopping for an underwater camera and housing:

Shop for the housing first: Check out housings before buying a camera. There can be a limited selection, or none available for certain types of cameras such as “super-zooms”. Popular brands like Nikon, Canon, Olympus, Panasonic and Sony are generally supported, but not all models.

House the latest camera available:
Housings cost the same for an older camera as a newer one. Housing an old camera is typically not a good investment and you don’t have access to all the latest features and image quality. Plus resale later isn’t as great.

House an advanced model camera: Quality housings can cost as much, or several times more, than a camera. The camera actually becomes the least expensive part of the system. You’ll find better choices, and have better resale later, with a more advanced camera then a lower-end consumer model. Some less expensive model cameras won’t work with lenses that are popular for use underwater either.

Basic Camera Design Considerations for Underwater Use

Digital cameras have many parts, but are all basically pretty similar in their basic operation. One concept to remember is that you are not capturing a photo of the subject, you are capturing the light reflected off it. This light is focused by a lens on a sensor, adjusted by both lens and camera controls, is captured, processed by an internal camera computer, and written to memory, usually an SD or other type of card.

Obviously size, design, weight and price can determine much of their capabilities. But components also break them down into various classes of design by the camera manufacturers.

Considerations in selecting a camera include:
    •    Sensors
    •    Lens(es)
    •    Controls and Software Menus
    •    Processor, frame buffer,
    •    Battery, viewfinder
    •    Ergonomics and ease of use

Sensor Size - Bigger Is Better

Sensors are the “film” the camera uses to capture images on it’s “pixels”. The larger the sensor, the larger and denser the amount of pixels, thus more detail, sharpness, fine colors and gradation (also known as dynamic range), can be captured. A larger sensor also has better low-light abilities.

They range in size and are commonly referred to their crop factor from a 35mm peace of film - which is known as full-frame.

Pixel Count: Don’t confuse mega-pixel count (MP) with sensor size. A larger sensor with a smaller MP count is a better imaging engine, because it’s spreading the image over larger pixels. Larger pixels capture more accurate information as there are fewer “gaps” that the camera has to interpret and they work better in low light.

Thursday, September 17, 2015

Underwater Tray & Lighting System Assembly Instructions

Assembly Instructions

Below you'll find instructions for assembling some of our trays and lighting packages. Assembly may vary with the types of trays, arms and strobes you purchased, but these should guide you in general. You can also refer to the photos of the products on our store website.

Friday, September 11, 2015

Olympus MZ 7-14mm f/2.8 PRO and MZ 8mm FE f1.8 PRO Lens Underwater Port Guide

The new Olympus MZ ED 7-14 f/2.8 PRO and MZ ED 8mm FE PRO lenses are very popular. They are sharp, fast, well-made and open up new abilities to shoot underwater in low light (see our reviews here and here). There are a number of ways to house these new lenses depending on how you shoot, or what dome ports and parts you might already own.

In general, larger glass dome ports are going to give better results, with less corner distortion and the ability to shoot over & unders, but they be harder to use and pack. They also can be adapted to fit other lenses in the future.

Acrylic ports are lighter, less expensive, but scratch more easily. However, they are usually easy to fix.

Here's a list of some different configurations:

For Nauticam N85 MIL housings (NA-EM5, NA-EM1, NA-EM10, NA-EM5MKII, NA-EPL5, etc) we recommend the following configurations:

For Olympus M.Zuiko ED 7-14mm f/2.8 PRO Lens:
Olympus MZ ED 7-14 f/2.8 PRO Lens

  • Nauticam focus gear 36055
  • Nauticam zoom gear 36054
(option #1 Nauticam Dome)
  • Nauticam 36401 N85 to N120 Port Adapter
  • Nauticam 18809 180mm Dome Port
(option #2 Zen Dome)
  • Nauticam 36204 N85 to N120 Port Adapter
  • Nauticam 21120 Extension Ring 20 with Lock
  • Zen Underwater DP-170-N120

 For Olympus M.Zuiko ED 8mm f/1.8 PRO Lens:
  • Nauticam focus gear 36056
(option #1 - small Nauticam dome)
  • Nauticam 36132 4.33” dome port
  • Nauticam 36620 Mini Extension Ring 20
(option #2 - small Zen dome)
Olympus MZ ED 8mm FE PRO Lens
  • Zen Underwater DP-100-N85 (new version)
  • Nauticam 36630 Mini Extension Ring 30
(option #3 - larger Zen dome)
(option #4 - larger Nauticam dome)
  • Nauticam 36048 N85 Fisheye 140 Dome Port
  • Nauticam 36617 Mini Extension Ring 17

For Olympus PT-EP housings, we recommend the following configurations:
  •  Olympus PPZR-EP05 focus gear V6360480W000
For Olympus M.Zuiko 8mm f/1.8 PRO Lens:

Olympus PPO-EP02 Dome Port
For Olympus PT-EP08 or PT-EP11 housings
Note: Currently there is no way to house the Olympus MZ ED 7-14mm PRO lens in Olympus housings. The port body is too wide.

Thursday, September 10, 2015

New Issue of PNW Diver is Now Available

The September/October 2015 edition of the PNW Diver is now available for a free download.

This is an interactive PDF so the links will take you directly to a URL link or email. If you have access to a iPad, simply save this to your iBooks for easy viewing.

The September/October issue offers another round of amazing photographers and videographers. They are featuring Jared Jensen, from Washington who is both a photographer and videographer. Be sure to take the time to watch his extraordinary videos. Steve Taylor, from BC, has presented us with astounding images many using a snoot. Quite a skill, indeed! Jim McGauhey offers years of experience and wisdom about his videography. Dale Carlisle tempts us photographers with the double hose regulator, and Ben Normand offers us a unique photographic idea. Mike Meagher has written Part 4 of his video series taking out some of the mysteries of camera recording. Rob Roy tells us his experiences on switching to a rebreather, and Kerry Enns gives a lesson on the DeHaze slider in Lightroom. Don't forget to check out Bob Bailey's story and Eiko Jones' photography trips.

Monday, September 7, 2015

Sony a7II and Sea & Sea MDX-A7II Housing System Review


Last year I shot the Sony A7 in a Nauticam housing (review here). It seemed like it might be the future realized: a full-frame sensor, mirrorless camera, full of the latest technological advances. There was a huge buzz and it looked like it really might be the advanced photographer’s dream system; powerful, small and light with all the quality, sharpness, low-light and dynamic range (shades of color, particularly in the highlights and shadows) capabilities that a full-frame camera brings to the table.

But there were issues; a severe lack of lenses available in the new Sony FE mount, poor build quality (a plastic $2,000 body?) and slower than optimal AF. There were work-rounds, notably for underwater use the Nauticam Nikonos adapter that allowed use of the old Nikonos mount lenses, like the 15mm FE. But it simply wasn’t a fully-realized system for underwater use, although I enjoyed shooting it.


Sony upped the game with the release of the a7s and a7r models; high resolution and video specific versions, and then more recently released the much more revised a7II. Sony, (who never made a camera they wouldn’t change in the next month) has now released the a7IIR model with amazing 4K video recording capabilities, etc. However that model was not available when I took this system on my trip to the Solomon Islands.
The good news is that the a7IIR will fit existing housings with a small modification to the mode control knob (it now has a lock), so my comments are all pretty current. Time constraints didn’t allow me to shoot video, and with the a7IIR on the horizon this review doesn’t attempt to tackle that area.

The Sony a7II tackles most of the missing issues head-on. A much better, slightly larger metal-constructed body, greatly faster AF, and a host of other tweaks and improvements, makes it a much improved contender. Partnering with Zeiss, Sony has pushed ahead with releases of new lenses; notably for underwater use; the Zeiss 16-35mm, a (somewhat cumbersome) 28mm with wide and FE converters, and lastly a great 90mm macro lens - something that Sony seems to overlook among their many different mount lenses.

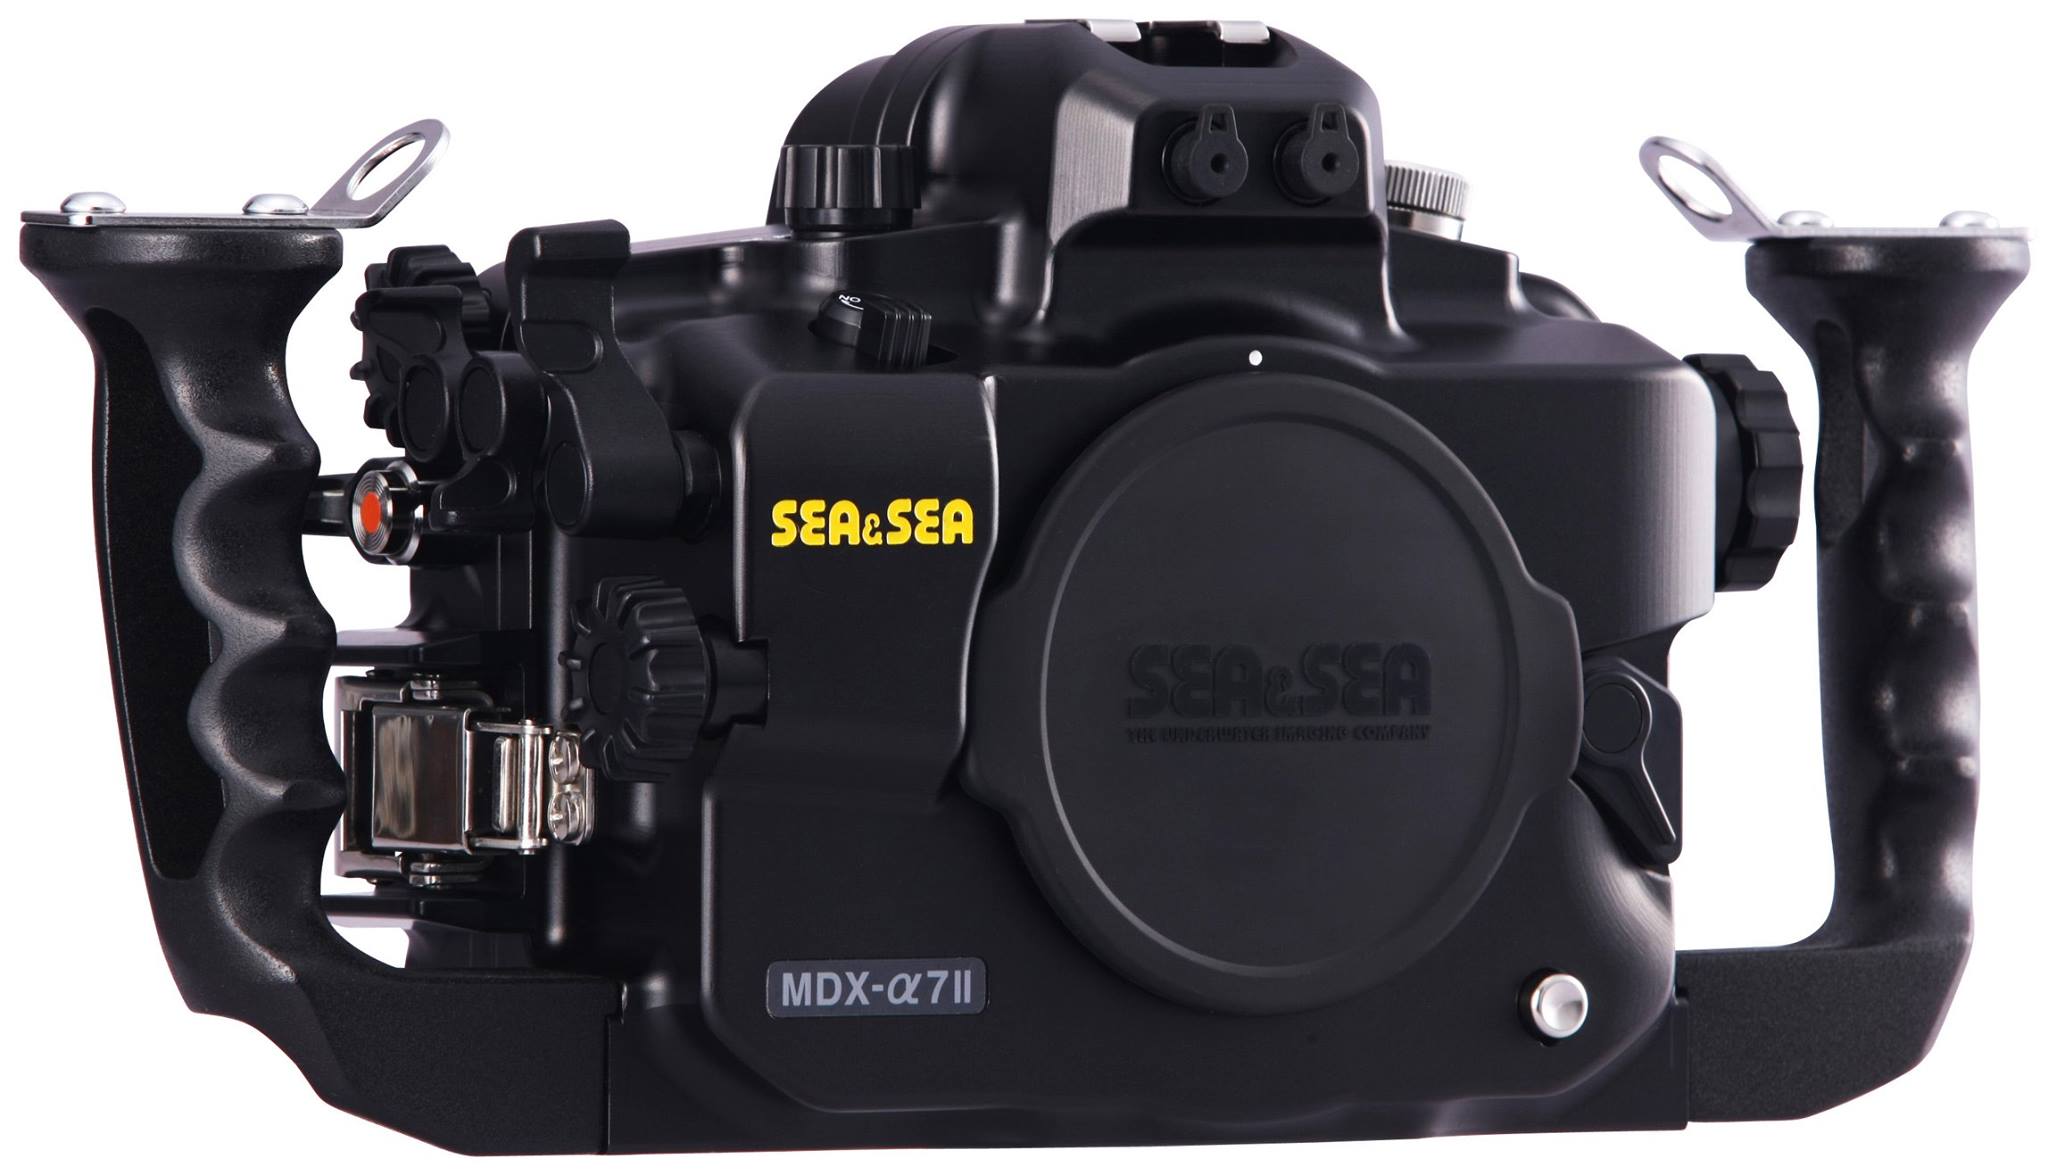
I was also excited to see that Sea & Sea was aggressively entering the mirrorless housing market, first with their aluminum MDX-a6000 and now with the MDX-A7II systems. More players in the market means more choices for the consumer.

The MDX-A7II is the first Sony a7II housing to work in optical sync D-TTL with Sea & Sea’s YS-D1/D2 strobes utilizing an internal optical sync controller. However, the prototype controller was not working and one of the new YS-D2 strobes gave up working in TTL.  So I switched to electrical sync with manual control which worked out fine. (Sea & Sea has gotten this ironed out on the release version).

Sea & Sea hasn’t released new ports for this camera like they did for the MDX-a6000. I shot the Zeiss 16-35mm lens behind the 8.5” Sea & Sea Fisheye Dome Port with a Focus Extension 46. The Sony 90mm macro lens fit behind the standard Flat Port 87, but it really needs a shorter macro port for best magnification. The new FE full-frame lenses for the a7II like the 16-35mm Zeiss, have a large diameter, they end up being close to the same size as similar Nikon and Canon lenses. This means that they have to be housed in larger 100mm diameter ports, or with an adapter in DSLR ports. But this is all taking away from the ideal, lighter, smaller system that’s promised by a mirrorless camera.

The issue with using a MIR to DSLR port adapter is that if you have wider-body lenses like the 16-35, and you want to change a battery, you have to take off the DSLR port, then the lens, then the housing back and camera body. Then reassemble. You end up with a lot of expensive parts out on the camera table and a lot of chances to get debris on your o-rings. This is true for both the Nauticam and Sea & Sea housings for the Sony with these lenses. The 90mm macro or similar sized lenses can be slid out without port removal.

The a7II battery lasted pretty well while using electrical sync (or the optical controller) for stills, but video users may find that they are needing to change batteries after a couple of dives. (Also one of my gripes with Sony cameras is that they don’t come with a separate battery charger - it’s an option for a high-end $2500 body!)

The housing fits the Sony a7II camera nicely, and the controls all worked well. Like the MDX-a6000, Sea & Sea has used a locking port lever, ports push on, rotate and then you lock them down. I found the weight in the water with the acrylic dome port to be almost too light, due to the larger DSLR-size dome port. Acrylic dome ports have a tendency to twist up in the water due the large bubble they hold. This balance was more pronounced on the MDX-a7II, as the housing is smaller and is less of a counter balance to the large dome.

Shooting the Sony a7II was very fast and responsive. The Zeiss 16-35mm was a very nice lens to use, more adaptable and certainly easier to use than the all-manual 15mm Nikonos FE I shot last year. (Sea & Sea also supports the Sony 28mm and conversion lenses). I never had any trouble catching focus with it. The Sony 90mm macro is also a great option for this camera and shot well, although I had problems using a diopter with it due to the longer Port 87 not fitting well. Overall, the camera was satisfying to shoot, and I really liked it’s techy features like focus peaking. I also found the view screen sharp and easy to use, I didn’t need to use the viewfinder at all. Zoom controls for the 16-35mm lens were smooth, although it is moved out onto the port, so my fingers kept getting confused, I had to reach forward a bit to access it.

However, I’m a Nikon kind of guy, ok sort of a dinosaur. I love my D800 and I tend to compare everything to it. I feel for the relative size of the system after adding in larger lenses and ports, you really are giving up a lot of options that you have with a DSLR. There are simply many more lenses available; DSLRs are a much more mature platform. For instance, the Sony FE lens line still needs a decent fisheye lens. The auto focus on the Sony a7II is fast, just not as fast and accurate as on a good DSLR.

Subjectively, I just don’t find that I am seeing the same sharpness and dynamic range I can get with the D800. I took sharp photos, but I had to work for them, the camera was finicky to lock focus in the right spot like I can with my D800.

Yes, the D800 is a bit heavier and larger, but not by much, especially in the water. Domes for equivalent Nikon 16-35mm or 17-35mm rectilinear lenses are very large, ideally 230mm (9.25”), but I have found I can use a smaller 170mm dome and shoot around the corner issues it presents.

For me, if I want a smaller rig, I’ve found the Olympus O-MD E-M1 system to be an ideal compromise between features, weight and quality, easily shooting as well as a cropped-frame camera with a much smaller footprint, an excellent selection of lenses and well-supported through many housing manufacturers.

This all is going to be different for video shooters where mirrorless cameras, and particularly a technologically advanced camera like the a7IIR, offer a lot of advantages. The Sony a7IIR holds a lot of promise and should be very popular for those users and for those wanting a bit more than m4/3rds cameras can deliver. The Sea & Sea MDX-A7II is a nice, well-built housing with all the features and quality you’d want.

Translate